Archive | March, 2013

Avocado Hummus With Coriander and Lemon

27 Mar

Avocado Hummus

We are coming to the end of the Hass avocado season here now and I can’t believe I haven’t shared a recipe with you using my favourite fruit/vegetable yet. Avocados are excellent for helping to lower cholesterol, keeping  your heart healthy, preventing cancer and alleviating symptoms of arthritis.

Avocados on TreeThey are still cheap and plentiful here at the market so I bought a kilo on Sunday. One of my favourite recipes using avocado is this Tricolor Baked Avocado. If you’ve never tried avocado cooked you should, it’s surprisingly delicious.

avocados

This is new recipe to me and I have to say it is definitely a keeper. Two of my favourite dishes fused together in a bowl.  It’s a hummus and guacamole hybrid. It shouldn’t work but it does, brilliantly. And it’s quick, easy, healthy and addictive.

Perfect for a snack or late night supper when you can’t be bothered with anything complicated.

Avocado Hummus

Avocado Hummus Recipe

Serves 2-3, vegan, gluten-free. Adapted from Kiran Tarun

  • 200 g cooked chickpeas (drained & rinsed)
  • 1 large avocado (I used 2 mini ones)
  • 1 large clove garlic
  • 3 Tbsp tahini
  • juice of 1 lemon
  • a big handful of fresh coriander
  • 1/2 tsp ground cumin
  • 1/2 tsp chipotle chilli sauce (optional)
  • salt & black pepper
  • olive oil

Put all the ingredients into a food processor (or use a stick blender) with a splash of olive oil and puree until smooth. You can add more oil if you need to get the right consistency. Taste and check seasoning.

Avocado Hummus

Serve with raw veggies or toasted pita for dipping. You could try making your own flour tortilla or flatbread crackers by brushing them with oil, cutting into triangles with scissors, sprinkling with cumin, salt & pepper and baking at 125C for about 10 minutes until crispy.

Or just spread it on some wholemeal toast, sprinkled with sea salt. Heaven.

Avocado Hummus

If you are a bit of a hummus freak like me. Have at look at this Authentic Creamy Hummus and this Roasted Beetroot Hummus too.

Enjoy!

imagesCAFT0O3W

Kimchi – Korean Chilli and Ginger Cabbage Pickle

25 Mar

Korean Kimchi

I think Kimchi is probably one of those Love or Hate things, like Marmite. I’m definitely a lover not a hater of both. I can see why you would be put off I suppose. I mean it’s fermented cabbage for want of a better description. Kids will love it.

Chinese Cabbage & Korean Chiili Flakes

It’s my new favourite thing. If you have never heard of it, where have you been? It’s a spicy Korean cabbage pickle (or condiment really) that can be used to liven up a huge amount of dishes. There are recipes using it all over the internet for Kimchi Fried Rice and Kimchi Pancakes among other things. It is a really versatile thing to have in your fridge for those “What are we having for lunch/dinner that only takes 15 minutes” moments.

Kimchi

This recipe is healthier than most as it uses an apple for sweetness rather than the evil sugar monster. We like that.

Korean Kimchi

Korean Kimchi Recipe

Makes 1 large jar, vegan, gluten-free, refined sugar-free.

Adapted from Dr Ben Kim & Centre Stage Wellness

  • 1 Chinese cabbage (aka napa cabbage) the long ones (about 500g)
  • 4 Tbsp sea salt
  • about 450 ml (2 cups) warm water
  • 4 Tbsp Korean red chilli flakes/kimchi chilli powder (buy from Asian stores)
  • 1 Tbsp minced garlic (about 3 cloves)
  • 1 Tbsp minced ginger
  • 3-4 spring onions/scallions, sliced 
  • 2 Tbsp fish sauce (optional)
  • 1 large apple
  • 1/2 onion

Discard any outer damaged leaves, separate off all the cabbage leaves, rinse and chop into bite-size pieces. Dissolve the sea salt in the bowl of warm water, pour it over the cabbage and mix it well. Leave it to sit for at least four hours.

Rinse the cabbage well to remove excess salt then put it in a large bowl. Mix the Korean chilli flakes with a few tablespoons of warm water to create a paste, add the minced garlic and ginger and stir together well. Pour this onto the cabbage, stir through the spring onions and fish sauce if using.

Blend the cored apple with the 1/2 onion and about 200 ml (3/4 cup) water then add this to the cabbage as well. Mix everything together really well with a wooden spoon or with your hands (using gloves) to make sure everything is well-distributed.

Transfer the cabbage with a clean spoon into a large sterilised glass jar or bottle, pressing it down well each time as you stack it up. Pour over any liquid remaining in the bowl but leave about 2 inches clear at the top of the jar/bottle before sealing it up. Leave the  kimchi to sit at room temperature for 24 hours.

The kimchi is now ready to eat. Store it in the fridge and it will continue to ferment slowly over time. As long as you use a clean spoon every time you take some out, it should keep for up to a month in the fridge.

Korean KimchiAdd a big dollop of it to vegetable stir fries to add another level of flavour, or to this Soba Noodle Salad or this Mee Goreng. It’s great in Asian style soups with some miso.  I love it sautéed with some broccoli, soy sauce and sesame oil which you can eat with noodles or add the whole lot to an omelette made with a bit of soy sauce or even some scrambled eggs. It is a fantastic thing to have around for food emergencies.

Have I convinced you yet?

imagesCAFT0O3W

Mushroom Risotto Stuffed Baked Fennel Bulbs with Tomato Sauce

20 Mar

Risotto Stuffed Fennel with Tomato Sauce

Fennel is another one of those vegetables, like cauliflower, that gets a bit of a bad name. People have preconceived ideas about it. They don’t like it. But many have never tried it cooked. I may have been one of those narrow-minded people.

Fennel Plants

Running past this field full of feathery fennel fronds floating in the breeze in front of an 11th Century Moorish watchtower while Rufus begs me to turn around and run back because of the pack of very tiny dogs who bark (or actually yap) at his heels as we pass, made me want to research this undervalued vegetable a little more deeply.

And by research I mean, look at recipes. On Pinterest mainly. Not that I’m addicted or anything but that is where I store all of the recipes I like the look of and want to make soon.

Mushroom Risotto Stuffed Fennel Bulb

The idea for this recipe didn’t come from Pinterest though. It came from Jim, The Washer Up’s dad. It’s not his recipe. I don’t think he stretches much farther than a ham sandwich in his own particular kitchen, but he does send me everything food related cut out from the British press, neatly folded in a brown envelope every couple of weeks. This is always a very welcome distraction, for me, from any cleaning that might need doing.

It was in one of those envelopes that I found out about baking and stuffing fennel.

Fennel Stock & Bulbs

Because I bought four whole fennel (complete with long feathery fronds still attached)  from the farmer’s market on Sunday, I decided I wouldn’t waste all of that aniseedy greenery and I made a stock out of them for the risotto. This isn’t essential but if you have them, you may as well if you have the time.

Risotto Stuffed Baked Fennel

In the original recipe they stuffed the fennel with wild rice. I decided to make a risotto using brown rice and the mushrooms I had in my fridge and use that to stuff them instead.

I have finally worked out how to make risotto from brown rice that actually looks and tastes like risotto. You have to part cook the rice first so it is nearly done. Then you add it to the risotto and continue as you would with uncooked risotto rice. It’ so much softer and creamier. I have to give credit to The Washer Up for this tip, he has been telling me to do it for ages.

And he was right. There I said it.

Risotto Stuffed Fennel

To make the fennel stock I cut the stalks and fronds off of the fennel bulbs and chopped them up roughly. I put them in  a large pot with 3 or 4 bay leaves, 15 whole peppercorns and a good teaspoon of salt. Bring this to the boil then lower the heat and simmer, covered for about an hour. Taste and add more salt if necessary . Then drain and store in the fridge or freezer in 500 ml or 1 litre pots.

You can just use a normal vegetable stock if you don’t have the fronds, time or inclination.

Mushroom Risotto Stuffed Baked Fennel Recipe

Serves  4, vegetarian. Adapted from

  • 300 ml brown rice
  • 600 ml fennel stock or water

Put the rice and stock/water in a pan. Bring to the boil then lower the heat, cover and cook for about 15 minutes until the rice is nearly cooked. Drain if necessary. Rinse under cold water if not using straight away to stop the cooking and set aside.

  • 4  fennel bulbs
  • olive oil
  • salt & black pepper
  • white wine (or cava)

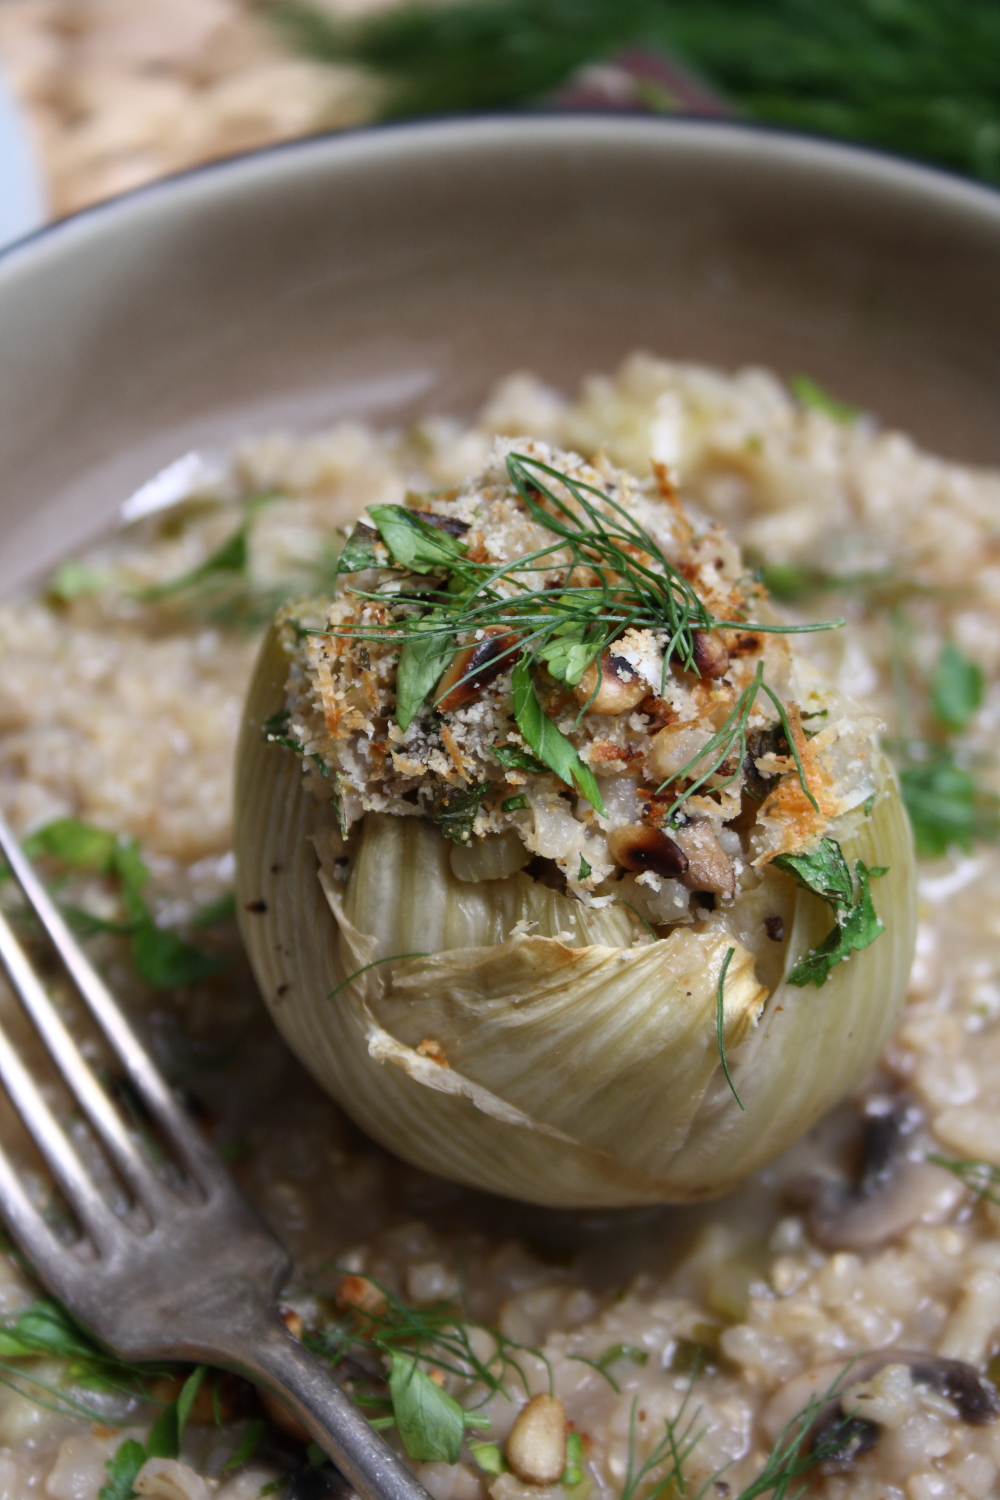
Preheat oven to 180C. Cut about 2 cm off of the base of each bulb so it can stand up. Then cut another inch or so off of the tops. Remove any damaged/bruised outer layers. Using a teaspoon, hollow out the fennel bulbs as best you can (see picture above) reserving the fennel flesh for the risotto.

Stand the hollowed out fennel bulbs on a large sheet of foil, drizzle with olive oil and season well with salt & pepper. Start to bring the edges of the foil up and around the fennel then carefully pour in about 4 Tbsp white wine. Seal the foil package completely around the fennel but make sure that they are still standing. Bake for about 40-45 minutes until nicely softened.

  • reserved fennel flesh from above, finely chopped
  • 1 stick celery, finely chopped
  • 1/2 onion, finely chopped
  • 2 cloves, garlic, finely chopped
  • 1/2 tsp dried thyme
  • a good pinch of dried chilli flakes
  • 1 lemon, zested 
  • about 250 g mushrooms, cleaned & sliced
  • a splosh of white wine
  • up to 1 litre vegetable/fennel stock
  • 30 g grated manchego/parmesan
  • a handful of breadcrumbs
  • a handful of manchego/parmesan
  • fresh parsley, finely chopped
  • a handful of pine nuts, toasted in a dry pan
  • tomato pasta sauce/marinara sauce

Put the stock in a small pan over a medium heat and keep hot but not boiling.

Heat 2 Tbsp olive oil in a large pan over a medium heat, add the onion, celery, chopped fennel and a pinch of salt and cook for about 4 minutes until softened but not browned. Then add the garlic, thyme, chilli flakes, half of the lemon zest and cook for another 2 minutes.

Add the mushrooms, cook for three minutes until softened then add the part cooked rice. Add a good splosh of white wine and cook until evaporated. Season well with salt & black pepper then start adding the hot stock a ladleful at a time, waiting for it to be absorbed before adding the next ladleful, stirring and swirling occasionally. Keep going until you have used all the stock and the rice is cooked. The risotto should be soft and quite liquidy.

Add a squeeze of lemon, a little of the chopped parsley and stir in the 30 gr grated manchego/parmesan. Turn off the heat, put a lid on and leave for 3-5 minutes. Heat up your tomato sauce.

If your fennel bulbs are done remove them from the oven and put the grill/broiler on high.

Mix together the breadcrumbs, grated manchego/parmesan, rest of the lemon zest, some pine nuts & some chopped parsley in a small bowl.

Check the risotto for seasoning add more salt if necessary. Spoon some risotto into each fennel bulb right to the top and a little bit more, sprinkle over the breadcrumb mix and put them under the grill for a minute or two until browned.

To serve: Cover the base of each dish with a shallow pool of risotto and place the stuffed fennel in the middle. Spoon some of the tomato sauce on and around the dish and garnish with some of the breadcrumb mix if you have any left, some chopped parsley or fennel fronds.

Risotto Stuffed Fennel & Tomato Sauce

Buen Provecho!!

imagesCAFT0O3W

Wholemeal Chocolate Chunk and Hazelnut Cookies

9 Mar

Wholemeal Chocolate Chunk & Hazelnut Cookies

Just a quick post because I promised you the recipe for these last week after my first Healthy Baking with Chocolate workshop. I am in the middle of writing (and editing heavily) a speech on the relationship between food and health, particularly cancer, for the Marbella Women’s Week conference next week.

I say I. I mean we. Actually he is doing an awful lot of the editing and an awful lot of adding bits in too. It’s only a ten minute talk. I need to focus. So instead I’m writing about cookies.

Wholemeal Chocolate Chunk Cookies

Now I’m not saying you should eat these every day or anything but compared to most cookies these are much healthier.They are made with olive oil instead of butter. I use honey and maple syrup (or miel de cana) instead of sugar and the wholemeal spelt flour gives them a lovely flavour.

It’s Mother’s Day in the UK tomorrow so these are for my mum. She loves a biscuit with a cup of tea. They probably have too many bits in for her taste but it’s the thought that counts and I’ve ordered flowers in colours that match her lounge cushions and curtains so I should be safe. She does love it when things match.

Wholemeal Chocolate Chunk & Hazelnut Cookies

Wholemeal Chocolate Chunk & Hazelnut Cookies Recipe

Makes 10-12 cookies. Vegan, wheat-free.

  • 150 g wholemeal spelt flour
  •  1 tsp baking powder
  •  1/2 tsp baking soda 
  • 1/4 tsp salt
  •  4 Tbsp maple syrup or miel de cana
  •  1 Tbsp honey or agave syrup
  • 1/2 tsp vanilla extract
  •  a few drops of almond extract (optional)
  • 4 Tbsp olive oil
  •  about 70 g 70% dark chocolate, roughly chopped
  • 60 g hazelnuts or almonds roughly chopped

Preheat oven 175 C. Line a baking sheet with baking paper

In a bowl mix the flour, baking powder, baking soda, salt, nuts and chocolate together  well.

In a jug whisk together the oil, maple syrup/miel de cana, honey/agave, vanilla and almond extract, if using. Pour this into the flour bowl and gently mix together until just combined.

Take a tablespoon of the mix and put it on the lined tray, pressing it down slightly with your fingers. Continue with the rest of the mix leaving  an inch or so in between each so they can spread. Bake for 11 minutes until just golden, leave on the tray for 1 minute then remove to a wire rack to cool. This stops them drying out. Store in an airtight container.

Wholemeal Chocolate Chunk & Hazelnut Cookies

 Happy Mother’s Day Mum!

Now back to the speech…

imagesCAFT0O3W

Za’atar Spice Roasted Red Cabbage Steaks

6 Mar

Za'atar Spice Roasted Red Cabbage

Red cabbage may not be your favourite vegetable. It wasn’t mine.  I have always loved the colour of it though. You’ve got to love food that is such a beautiful shade of magenta. When I run past these purple and green striped fields of  cabbages I can’t help but smile.

Cabbages

Another thing that makes me happy is the price. They are so cheap at the moment at the farmer’s market and if you have ever bought a cabbage you will know how far it goes. I mean these things go on for ever.

I use about a quarter of a white cabbage in this fridge emptying favourite Minestrone Soup that I now serve topped with a swirl of homemade basil pesto, it makes such a difference to the flavour.

mont 3

You can’t really use red cabbage in that soup though, it turns everything purple. Other than using it to make my Grandad’s Pickled Red Cabbage I have never done anything exciting or blogworthy with this beautiful Brassica. Until now that is.

Za'atar Red Cabbage Steaks

I found a recipe for roasted red cabbage steaks on Drizzle & Dip that immediately caught my eye.  She used a different spice mix but the idea is the same and I have been wanting to incorporate Za’atar into a recipe for a while.

Z'a'atar Spice Oil

Za’atar is herb and spice blend popular throughout the Middle East most often made with a mix of dried oregano, thyme, sesame seeds, sumac and salt. There are other variations if you want to research it more.

It has many uses but its most common guise is to be mixed with olive oil, rubbed over flatbread dough and baked. You can also dip your toasted flatbread straight into a pot of it on the table. It can be used as a quick and easy marinade or rub for meat, fish and vegetables as well, as I have done here.

Za'atar Roasted Red Cabbage Steaks

Za’atar Spice Roasted Red Cabbage Steaks

Serves 2-3 as a side dish. Vegan, gluten-free.

For the za’atar

  • 1 Tbsp sumac (used ground cumin or coriander if you can’t find it)
  • 1 Tbsp fresh or dried thyme
  • 1 Tbsp dried oregano
  • 2 tsp sesame seeds
  • 1/4 tsp salt
  •  a few grindings of black pepper
  • a pinch of red chilli flakes

Mix this all together and store in an airtight container.

  • 3 – 4 Tbsp olive oil
  • 1/2 a red cabbage (or more)  cut into 1/2 – 1 cm thick slices 
  • sea salt to serve

Mix the oil with the za’atar in a small bowl. Preheat the oven to 180C and line  baking sheet with baking paper.

Lay the cabbage steaks out on the baking sheet and spread the za’atar oil all over them, you may need some more oil. Bake for 20 – 25 minutes depending on thickness and serve sprinkled with sea salt.

Za'atar Roasted Red Cabbage

Serve these as a side dish or for a party as part of a mezze table with some Baba Ghanoush, Muhammara, Sweet Potato Filo Cigars , Roasted Beetroot Hummus and this Lebanese Lentil Salad. Just a suggestion.

Za'atar Red Cabbage Steaks

Make some more of the Za’atar straight away so you will always have some for dipping bread into or for a quick salad dressing or to serve over a plain hummus. The possiblities are endless.

You will be addicted, I am.

Za'atar Spice Oil

Things That Made Me Smile Today

Rainy Day Dog

This little fella was all ready for the rain. He was really working that outfit and Rufus was a little jealous of all the attention he was getting…

imagesCAFT0O3W

food to glow

feel good food that's good for you

Pease Pudding

Just another WordPress.com weblog

Chica Andaluza

Sometimes Up a Mountain in Andalucia and sometimes Down by the Sea on the English South Coast

Agrigirl's Blog

Placemaking for Healthier Communities and a Healthier Planet

for the love of yum

A girl who loves to cook fresh, fun, and global cuisine.

The Path To Authenticity

Mind, Body & Spiritual Growth