Tag Archives: baked

Mushroom Risotto Stuffed Baked Fennel Bulbs with Tomato Sauce

20 Mar

Risotto Stuffed Fennel with Tomato Sauce

Fennel is another one of those vegetables, like cauliflower, that gets a bit of a bad name. People have preconceived ideas about it. They don’t like it. But many have never tried it cooked. I may have been one of those narrow-minded people.

Fennel Plants

Running past this field full of feathery fennel fronds floating in the breeze in front of an 11th Century Moorish watchtower while Rufus begs me to turn around and run back because of the pack of very tiny dogs who bark (or actually yap) at his heels as we pass, made me want to research this undervalued vegetable a little more deeply.

And by research I mean, look at recipes. On Pinterest mainly. Not that I’m addicted or anything but that is where I store all of the recipes I like the look of and want to make soon.

Mushroom Risotto Stuffed Fennel Bulb

The idea for this recipe didn’t come from Pinterest though. It came from Jim, The Washer Up’s dad. It’s not his recipe. I don’t think he stretches much farther than a ham sandwich in his own particular kitchen, but he does send me everything food related cut out from the British press, neatly folded in a brown envelope every couple of weeks. This is always a very welcome distraction, for me, from any cleaning that might need doing.

It was in one of those envelopes that I found out about baking and stuffing fennel.

Fennel Stock & Bulbs

Because I bought four whole fennel (complete with long feathery fronds still attached)  from the farmer’s market on Sunday, I decided I wouldn’t waste all of that aniseedy greenery and I made a stock out of them for the risotto. This isn’t essential but if you have them, you may as well if you have the time.

Risotto Stuffed Baked Fennel

In the original recipe they stuffed the fennel with wild rice. I decided to make a risotto using brown rice and the mushrooms I had in my fridge and use that to stuff them instead.

I have finally worked out how to make risotto from brown rice that actually looks and tastes like risotto. You have to part cook the rice first so it is nearly done. Then you add it to the risotto and continue as you would with uncooked risotto rice. It’ so much softer and creamier. I have to give credit to The Washer Up for this tip, he has been telling me to do it for ages.

And he was right. There I said it.

Risotto Stuffed Fennel

To make the fennel stock I cut the stalks and fronds off of the fennel bulbs and chopped them up roughly. I put them in  a large pot with 3 or 4 bay leaves, 15 whole peppercorns and a good teaspoon of salt. Bring this to the boil then lower the heat and simmer, covered for about an hour. Taste and add more salt if necessary . Then drain and store in the fridge or freezer in 500 ml or 1 litre pots.

You can just use a normal vegetable stock if you don’t have the fronds, time or inclination.

Mushroom Risotto Stuffed Baked Fennel Recipe

Serves  4, vegetarian. Adapted from

  • 300 ml brown rice
  • 600 ml fennel stock or water

Put the rice and stock/water in a pan. Bring to the boil then lower the heat, cover and cook for about 15 minutes until the rice is nearly cooked. Drain if necessary. Rinse under cold water if not using straight away to stop the cooking and set aside.

  • 4  fennel bulbs
  • olive oil
  • salt & black pepper
  • white wine (or cava)

Preheat oven to 180C. Cut about 2 cm off of the base of each bulb so it can stand up. Then cut another inch or so off of the tops. Remove any damaged/bruised outer layers. Using a teaspoon, hollow out the fennel bulbs as best you can (see picture above) reserving the fennel flesh for the risotto.

Stand the hollowed out fennel bulbs on a large sheet of foil, drizzle with olive oil and season well with salt & pepper. Start to bring the edges of the foil up and around the fennel then carefully pour in about 4 Tbsp white wine. Seal the foil package completely around the fennel but make sure that they are still standing. Bake for about 40-45 minutes until nicely softened.

  • reserved fennel flesh from above, finely chopped
  • 1 stick celery, finely chopped
  • 1/2 onion, finely chopped
  • 2 cloves, garlic, finely chopped
  • 1/2 tsp dried thyme
  • a good pinch of dried chilli flakes
  • 1 lemon, zested 
  • about 250 g mushrooms, cleaned & sliced
  • a splosh of white wine
  • up to 1 litre vegetable/fennel stock
  • 30 g grated manchego/parmesan
  • a handful of breadcrumbs
  • a handful of manchego/parmesan
  • fresh parsley, finely chopped
  • a handful of pine nuts, toasted in a dry pan
  • tomato pasta sauce/marinara sauce

Put the stock in a small pan over a medium heat and keep hot but not boiling.

Heat 2 Tbsp olive oil in a large pan over a medium heat, add the onion, celery, chopped fennel and a pinch of salt and cook for about 4 minutes until softened but not browned. Then add the garlic, thyme, chilli flakes, half of the lemon zest and cook for another 2 minutes.

Add the mushrooms, cook for three minutes until softened then add the part cooked rice. Add a good splosh of white wine and cook until evaporated. Season well with salt & black pepper then start adding the hot stock a ladleful at a time, waiting for it to be absorbed before adding the next ladleful, stirring and swirling occasionally. Keep going until you have used all the stock and the rice is cooked. The risotto should be soft and quite liquidy.

Add a squeeze of lemon, a little of the chopped parsley and stir in the 30 gr grated manchego/parmesan. Turn off the heat, put a lid on and leave for 3-5 minutes. Heat up your tomato sauce.

If your fennel bulbs are done remove them from the oven and put the grill/broiler on high.

Mix together the breadcrumbs, grated manchego/parmesan, rest of the lemon zest, some pine nuts & some chopped parsley in a small bowl.

Check the risotto for seasoning add more salt if necessary. Spoon some risotto into each fennel bulb right to the top and a little bit more, sprinkle over the breadcrumb mix and put them under the grill for a minute or two until browned.

To serve: Cover the base of each dish with a shallow pool of risotto and place the stuffed fennel in the middle. Spoon some of the tomato sauce on and around the dish and garnish with some of the breadcrumb mix if you have any left, some chopped parsley or fennel fronds.

Risotto Stuffed Fennel & Tomato Sauce

Buen Provecho!!

imagesCAFT0O3W

Chewy Fruit and Nut Muesli Bars

28 Feb

Chewy Fruit & Nut Muesli Bars

This is the next recipe in my Sweet & Healthy series. I used to buy muesli bars all the time, I took them to work and college to snack on in the afternoon, you know when you get that craving for something sweet. The companies that make these spend millions on packaging and marketing to make you believe that they are the healthy alternative and are actually good for you.

So no true.

Chewy Fruit & Nut Muesli Bars

Nearly all of them are packed with sugar and oil or butter so that any goodness you might be getting from the fruit, seeds and nuts is completely irrelevant. You might as well buy a toffee apple with a side order of candy floss.

Fruit & Nut Muesli Bars

Making your own is really quick and easy, you have complete control over what goes in them and you aren’t paying for fake organic looking packaging and advertising campaigns with sunny farms in them. If you don’t like raisins leave them out, prefer hazelnuts to almonds then put them in instead.

Chewy Fruit & Nut Muesli Bars

Chewy Fruit & Nut Muesli Bars Recipe

Makes 8-12 depending how you cut them. Vegan, Gluten-free

  • 1 large very ripe banana
  • 90 g (1 cup) oats (gf)
  • 5 Tbsp grated coconut
  • 1 tsp vanilla extract
  • 8 Tbsp (1/2 cup) flax meal
  • 1 Tbsp honey/agave syrup
  • 4 Tbsp oat milk (or your choice of milk)
  • 1/2 tsp cinnamon
  • 50 g (1/3 cup) raisins
  • 50 g (1/3 cup) sunflower seeds
  • 50 g (1/3 cup) dried cranberries
  • 50 g (1/3 cup) flaked almonds

Preheat the oven to 175C and line a baking sheet with baking paper brushed with a little oil.

Put the chopped banana, oats, coconut, vanilla, flaxmeal, cinnamon and honey in a food processor and pulse together slowly. Add the milk a tablespoon at a time until it comes together. Add in the rest of the ingredients and pulse together again. You can blend it really well or leave some bits chunky.

Tip the mixture out onto the lined baking sheet and shape it into a flat, even square about 1/2 cm thick with a spatula. It takes a bit of time & patience to make it even but they will be easier to cut into squares or rectangles later. Top with a few more flaked almonds and sunflower seeds and press them down a bit.

Bake for 11-13 minutes until the edges are just starting to brown. Cut into 12 squares or 8 rectangles while still warm. Leave to cool and store in an airtight container.

Chewy Fruit & Nut Muesli Bars

It is my first Healthy Baking with Chocolate Workshop this Saturday 2nd March 5pm-9m. We will be making and tasting:

Chocolate Butterfly Cupcakes with Chocolate Ganache Filling

Dark Chocolate & Orange Almond Torte

Chocolate, Date & Walnut Energy Truffles

Chocolate, Hazelnut & Date Caramel Tart with an Almond Crust

Wholemeal Chocolate Chunk & Hazelnut Cookies

All of these recipes use wholemeal spelt flour or ground almonds rather than processed flours. We use coconut oil or olive oil instead of butter and use honey, maple syrup or miel de cana instead of refined sugars.

Here’s a preview of the cookies. If you are lucky I might have time to share the recipe with you next week…

Vegan Wholemeal Chocolate Chunk & Hazelnut Cookies

imagesCAFT0O3W

Sweet Potato Black Bean Enchiladas with Roasted Red Pepper Chipotle Sauce

22 Jan

Sweet Potato Black Bean Enchiladas

This is my type of comfort food. Spice roasted sweet potatoes cooked down and mashed with tomatoes then mixed with black beans, fresh coriander and lime juice. That’s the filling, you could just eat that on its own with spoon if you like.

Sweet Potato Black Bean Filling & Roasted Red Pepper Chipotle Sauce

But rolled up in soft flour tortillas and covered in the quick and easy Roasted Red Pepper Chipotle Sauce from my Mexican Tortilla Lasagne recipe it is divine. Not forgetting the handful of mature Manchego cheese that is grated over the top before going in the oven.

Step by Step Enchiladas

The final step of whacking it under a hot grill for 5 minutes at the end is what makes this special though. You need to give it that caramelised at the edges crispy cheese topping that is irresistible. To me anyway. You have to keep your eye on it, there’s a fine line between brilliance and burnt beyond repair.

Sweet Potato Enchiladas

Sweet Potato & Black Bean Enchiladas with Roasted Red Pepper Chipotle Sauce Recipe

Serves 4, vegetarian. Adapted from Call Me Fudge

  • 2 large sweet potatoes (about 300 g each)
  • olive oil salt & black pepper
  • oregano, allspice, ground cumin
  • 1/2 large red onion, finely chopped
  • 2 cloves garlic, finely chopped
  •  1 Tbsp chipotle chilli sauce
  • 1 tin (400ml) chopped tomatoes
  • 100 ml water
  • 1 tin (400 g) black beans, drained & rinsed
  • 10 x 8 inch tortilla wraps
  • a big handful of grated manchego cheese
  • a handful of fresh coriander, chopped plus garnish
  • lime/lemon juice
  • sour cream, or goat’s yoghurt to serve

Preheat the oven to 200 C and line a baking sheet with baking paper. Scrub the sweet potatoes well and cut into 1-2 cm dice. Put them on the baking tray, drizzle with olive oil, sprinkle with salt, pepper, oregano, cumin and allspice if you have it. Toss it all together with you hands to evenly coat then spread it all out in a single layer. Roast for 15-20 minutes until tender.

Heat a tablespoon of olive oil in a large pan over a medium heat and add the red onion. Cook for 3-4 minutes until softened then add the garlic and cook for 2 minutes more. Add in the cooked sweet potatoes, tomatoes, chipotle sauce and water. Bring to the boil, lower the heat and simmer for 5-10 minutes to cook the tomatoes. Mash the sweet potatoes in the pan then add the black beans, stir them through and add the chopped coriander. Season with salt & black pepper and a squeeze of lime/lemon juice. Taste and adjust as required. (Try not to eat it all).

For the red pepper sauce:

  • 1 jar/tin, roasted red peppers (about 200-250 gr), rinsed drained
  • about 100 ml tomate frito /puree tomato/tomato passata
  • 4 or 5 tsp chipotle chilli sauce
  • 2 tbsp olive oil
  • the other 1/2 large red onion, finely chopped
  • 4 or 5 garlic cloves, finely chopped
  • 1  1/2 tsp palm sugar/brown sugar
  • 1  1/2 tsp ground cumin
  • 1 tsp Worcestershire sauce (vegetarian)

Blend the drained, rinsed peppers, tomato puree, chipotle sauce, sugar, cumin & Worcestershire sauce in a food processor until smooth.

Heat the olive oil in a frying pan over a medium heat and cook the onion and a pinch of salt for 4-5 minutes until softened, then add the garlic and cook for a further 2 minutes. Remove from the heat and add to the processor with the red pepper sauce and blend again. Season with salt & black pepper and taste. Adjust as required.

To assemble:

Preheat oven to 190 C. You will need either one large or 4 individual ovenproof dishes. Or I used the dish in the pictures twice, this amount fed us both for two nights. The amount of tortillas depends on your dishes so just fill as many as you need.

Spread a layer of the red pepper sauce on the base of your dish(es). Take a few heaped tablespoons of the filling and lay it at one end of the tortilla (as in pictures above), roll up the tortilla and place it in the dish seam side down. Continue with the rest until your dish is full (you may have to trim some).

Tip the rest of the red pepper sauce all over the top of the wraps spreading it out evenly. Top with the grated cheese and bake for about 15 minutes. Then turn the grill/broiler on high and leave it under there for about 5 minutes. Keep an eye on it though, don’t ruin it!

Leave it for 5 minutes before serving with a dollop of sour cream/goats yoghurt, fresh coriander and a wedge of lime/lemon to squeeze over. A nice green salad would be good if you need something to accompany it. And a bottle of Coronita, of course.

Sweet Potato Enchiladas

Buen Provecho!

imagesCAFT0O3W

Sweet Potato and Feta Cigars with Tahini Yoghurt Sauce

31 Oct

 Just because it’s Halloween I am purposefully not posting a pumpkin recipe. I’m not of fan of Halloween and this is my pathetic attempt at rebellion.

This year I actually purchased hideous Halloween sweets from Mercadona for the lovely children next door who knocked incessantly on my front door last year.  I studiously ignored them because I didn’t have any sugary, chemically, teeth-rotting unhealthy products to give them. They repayed my kindness by chucking eggs at our front door, so The Washer Up went mad and chucked them back at the neighbours front door. So this year I bought sweets. I hope they’re happy.

So anyway, this is  my kind of treat, filo pastry cigars filled with roasted sweet potato, feta cheese, spring onion, fresh coriander, parsley and red chilli. Unsurprisingly Middle Eastern in origin and unashamedly Ottolenghi of course, who else? He has a new TV programme starting in November on More4, needless to say we are very excited.

The tahini yoghurt sauce is one of my favourite things, it is totally delicious. You can serve it just as a dip with flatbreads or raw veggies, or I have served it with these Cauliflower Fritters, these Baked Falafel Cakes and these Muhammara (Roasted Red Pepper & Walnut) Cigars too.

Sweet Potato & Feta Cigars Recipe

Makes 6 cigars, serves 3-4, vegetarian. Adapted from Ottolenghi for The Guardian

  • 1 large sweet potato (about 400 g), scrubbed clean
  • 2 spring onions, chopped
  • 75 g Greek feta cheese, crumbled
  • a handful of fresh coriander, chopped
  • a handful of fresh parsley, chopped
  • 1 red chilli deseeded & chopped
  • 1/2 tsp salt
  • freshly ground black pepper
  • 6 sheets of filo pastry (defrosted if frozen)
  • olive oil for brushing
  • sesame seeds

Preheat the oven to 200C. Prick the sweet potato a few times with a knife and place directly on a rack in the oven. Roast for 45-50 minutes until soft and cooked all the way through. Cut in half lengthways and leave until cool enough to handle.

Scrape out all of the sweet potato flesh into a bowl and mix with feta, spring onions, herbs, chilli, salt & pepper mashing with a fork. Taste for seasoning and leave to cool completely.

When ready, preheat the oven to 200C, line a baking tray with parchment and brush with a little oil. Unroll the filo pastry sheets and cover them with a clean tea towel to stop them drying out. Remove two sheets together and place them on top of each other on your work surface with the short end facing you, so you have a double layer sheet. Cover the rest back up with the tea towel.

Cut the two sheets in half lengthways this will make two cigars. On the left hand double layer strip, put a few heaped tablespoons of the filling in a sausage shape about 2 inches from the end of the pastry nearest you, leaving a centimetre free at each side end. Brush the pastry with a little olive oil and start to roll up your cigar around the filling, fold in the two side ends at about half way through and brush with a little more oil every now and then while you finish rolling up the cigar. Brush the top with some oil and place on the lined baking tray. Continue with the rest of the filling, you should get six cigars. You can refreeze (or refrigerate) the unused pastry.

Sprinkle a few sesame seeds over the tops of the cigars and bake for 25 -30 minutes until golden brown and cooked.

Tahini Yoghurt Dipping Sauce Recipe

Serves 3, vegetarian, gluten-free

  • 1 pot (125 ml) goat’s or greek yoghurt
  • 1 heaped Tbsp tahini paste
  • the juice of half a lemon
  • 1 Tbsp chopped fresh coriander
  • 1 Tbsp chopped fresh mint or parsley
  • salt & black pepper
  • cumin or sumac to serve

Mix all the ingredients together well making sure the tahini is mixed in and taste. Adjust lemon, salt or tahini to suit. Serve in bowl sprinkled with a little cumin or sumac and a few fresh herb leaves.

These are the perfect sweet treat for an evening huddled on the sofa with all the lights turned off pretending you’re not in…

Happy Halloween!!

Italian Courgette Crostata with Goat’s Cheese, Garlic and Basil

11 Oct

There is a whole field of courgette plants that I pass every morning with the dog. I have been watching the vegetables grow out of their delicate sunshine flowers and waiting for the day that I arrive and they have  all been harvested. I really hope they don’t leave them too long. They do that a lot here. Leave the courgettes to get too big before they pick them. I know if you grow your own that it is difficult to keep up with the mountain of courgettes that the plants produce but on a farm there is no excuse.

There is nothing worse than big, fat, watery courgettes. You really need them when they are young, firm and still squeaky. Like these ones I found at the market on Sunday.  These were only a euro for a kilo so I had to buy a kilo obviously.

Then you get home and realise you have a load of courgettes. One of my favourite things to cook with them at the moment is this crostata, we have it for dinner about once a week. A crostata is a freeform tart, an Italian version of a French galette. You cut a big circle of pastry, leave an inch or two border spread the base with some ricotta or yoghurt mixed with garlic & herbs, then make pretty concentric circles with courgette slices and brush with some herby garlic oil. You then roll up and crimp the edges and bake. It’s as easy as that, especially with this quick olive oil pastry recipe.

Courgette Crostata with Goat’s Cheese, Garlic & Basil Oil

Serves 4-6 as part of a meal. Vegetarian. Adapted from Smitten Kitchen

For the spelt olive oil pastry:

  • 250 g spelt or wholemeal flour
  • 1 tsp salt
  • 1 tsp dried herbs (I used 1/2 thyme 1/2 oregano)
  • 60 ml (1/4 cup) olive oil
  • 120 ml (1/2 cup) cold water

In a large bowl, mix together the flour, salt and herbs, drizzle in the olive oil mixing/mashing it in with a fork until well combined (a bit like crumble mix). Measure out the water then add an ice-cube to it. Slowly pour the cold water (not the ice-cube) into the flour and mix it in with the fork until just absorbed then bring it together with one hand kneading a little just until it forms a cohesive ball. Do not over work or it will be tough. shape into a flat disc, wrap in cling film and rest in the fridge until ready to use. It doesn’t need long but will keep well for a few days like that.

For the filling:

  • 2 firm small/med. courgettes, sliced into 1/2 cm coins on a slight diagonal
  • 1 pot goats yoghurt (about 100ml) or ricotta or greek yoghurt
  • a handful of grated manchego cheese (or parmesan/cheddar)
  • 25 gr crumbled goats cheese or feta
  • grated lemon zest 1/2 tsp
  • 1 clove garlic, finely chopped
  • a pinch of dried chilli flakes (optional)
  • 1+1/2 tbsp olive oil, plus extra for brushing
  • fresh basil leaves, finely sliced (plus extra for garnish)  or 1 tsp basil pesto
  • salt & black pepper

Lay the courgette slices on kitchen paper, sprinkle with salt and leave to sit while you prepare the pastry & filling.

In a small bowl mix (or blend) together the olive oil, garlic, chilli flakes, basil (or pesto) & lemon zest. Mix 1 tbsp of this in another bowl with the yoghurt (or ricotta), and cheeses. Season with salt & black pepper.

Preheat the oven to 200C and line a baking sheet with baking paper.  Roll out the pastry on a lightly floured surface, turning it quarter turns as you go to stop it sticking, to a very rough circle about 2-3 mm thick.  Take your largest dinner plate or serving plate,  place it lightly on the pastry and cut around it, remove the excess pastry and keep it in the fridge if there is enough for another small tart. Remove the plate with a sharp knife and lift the circle carefully, on a floured rolling pin, onto the lined baking tray.

Leaving a border round the edge of about an inch or two, spread the cheesy mixture out evenly over the pastry. Dry the tops of your courgette slices well with kitchen towel and then start laying them, overlapping slightly, around the edge still leaving the border clear.  When you have finished the outside circle start another circle going in the opposite direction just inside the first. Then overlap a few slices in the middle. See pictures above for these stages.

Drizzle and/or brush the rest of the garlicky herb oil all over the courgettes and then start to fold up the edges by turning the paper and folding and pleating as you go. Brush the pleated border with a little olive oil and bake in the preheated oven for 30-35 minutes until bubbling and golden. Leave to sit for 5 minutes then scatter over a few fresh basil leaves and serve.

Serve with a simple lemon & olive oil dressed green salad or this delicious White Bean Mash. This is a very versatile recipe, you could easily switch up the herbs and cheese to use whatever you have in the fridge.

I know I said I bought a kilo of courgettes and I only used two of them in this dish and I also know that a lot of you are overrun with courgettes at certain times of the year so maybe, like me,  you could have a go at making this deliciously light Zucchini Green Chilli Cornbread or these very moreish Baked Zucchini Fries as well.

Have a Great Weekend!!


Savoury Cherry Tomato Clafoutis with Basil, Goat’s Cheese and Courgette Blossom

7 Jul

I have been wanting to make a clafoutis for a while now. The traditionally sweet French dessert is made with fruit, usually cherries, cooked in a batter made with eggs, ground almonds, sugar and flour. Cherries are in season here now and are very cheap but it is impossible to find a cherry pitter/pipper/stoner or whatever it’s called, in this town. Apparently you can make it with the stones left in the cherries but I live with the most accident prone man in Andalucia and can’t be doing with the Heimlich manoeuver in this heat.

Thankfully our cherry tomato plant has just decided to produce a large amount of ripe fruit at the same time that the basil plants (purple and green) are growing like weeds. I say thankfully because I found a recipe for a savoury clafoutis in  The Little Paris Kitchen by Rachel Khoo that my friend Rhian bought me for my birthday. There are lots of lovely things in the book but the savoury clafoutis was top of my list of things to try especially with our little baby tomatoes.

I saw these courgette blossoms still with the little courgettes attached at the market and bought a load of them. I used some as a topping with some portobello mushrooms on a pizza but still had a few left so I sliced the mini courgettes into the clafoutis filling and topped them with a flower.

I made two individual clafoutis in mini loaf tins with this recipe but you can double it and make a big one in a baking dish or tin that should serve 4-6 as part of a lunch or picnic. Or use little ramekins.

You could change the cheese to a Manchego, Cheddar or Gruyère, switch up the herbs and use leftover roasted vegetables as an alternative filling. I served it with this French Potato Salad.

Cherry Tomato Clafoutis with Goat’s Cheese, Basil & Courgette Blossom

Serves 2-3 (easily doubled), Vegetarian. Adapted from The Little Paris Kitchen

Prep time: 10 mins Cooking time: 15-20 mins (small) 30-40 mins (large)

  • 50g goat’s cheese/feta
  • 50g cherry tomatoes, halved or quartered
  • 2 or 3 courgette blossoms (stamens removed) baby courgettes finely sliced (optional)
  • a handful of fresh basil leaves, finely chopped
  • a few sprigs of fresh oregano leaves, finely chopped
  • 2 eggs
  • salt & black pepper
  • 25g ground almonds
  • 1 tbsp flour
  • 50g goat’s yoghurt (or greek yoghurt)
  • 50 ml milk (I used oat milk)

Preheat oven to 180C and lightly oil and flour your dishes. Scatter the tomatoes, crumbled/torn goat’s cheese and sliced baby courgettes, if using, evenly over the base(s).

Whisk the eggs well with the salt & pepper then gently fold in the ground almonds and flour until just combined. Stir in the yoghurt, milk and fresh herbs.

Pour the batter over the filling and top each one with a courgette flower. Bake until golden brown and set. 15-20 minutes for small, 30 -40 minutes for larger. Tip them out of the moulds or serve from the large dish, warm or at room temperature.

Things That Made Me Smile Today………

Our new lavender plant, a beautiful magenta colour.

Huge, bright and blousy squash and pumpkin flowers, the first sign that autumn will arrive and along with it relief from the unbearable heat.

Enjoy your weekend..

Spiced Chickpea Falafel Cakes with Tahini, Yogurt and Mint Sauce

22 Jun

It may surprise you to find that this is the first time I have posted a falafel recipe. Falafels are emergency vegetarian food, especially when out and about. Wherever you are there is normally a Turkish kebab shop that can save your life when starvation takes hold and you need something quick and tasty.

I have a theory though. A falafel conspiracy theory, if you like. I think that the falafels you buy in most Turkish or Lebanese restaurants or cafes are made out of a packet mix. I know, controversial. My reason for this slanderous outburst is sound and based on personal experience. Theirs hold together and mine, do not. See the picture below for an example of a very lovely falafel we bought from an Israeli vendor at the market.

 Along with a delicious tabouli salad, spicy tomato dip, broad bean dip and cheese and potato puffs. Perfect picnic food. For when your friends have very kindly allowed you to spend the day by their pool while they are away.

I also some bought some gorgeous gladioli and a big box of irresistible looking plums at the market. I see plum recipes coming up. Anyway back to the falafels.

Correct me if I am wrong, and I am sure you will, but aren’t falafels made from chickpeas? The ones you buy seem to be made from bulgur wheat or couscous. They have a distinctly grainy inside that looks and tastes nothing like a chickpea, cooked or uncooked. Am I the only person that has noticed this? Don’t get me wrong they taste great and I love them but pureed chickpeas they ain’t.

That’s my excuse anyway. I’ve tried with cooked chickpeas and dried, soaked overnight chickpeas. Whatever, I have always had a disaster. Either too dense, hard and chewy because I’ve added so much chickpea flour to make them hold together or too sloppy and they fall apart and disintegrate as soon as I start to cook them in the oil. Until now that is…..

…actually that is a little bit of a lie. The first lot of these I cooked in oil and they disintegrated as usual. Tasted good but had to be scooped into a flatbread and eaten.

My success came about through baking them rather than frying. Mould them into patties, dust with a little polenta or cornmeal, brush with a tiny amount of oil and bake for about 30 minutes. They are still not the most stable of snacks, you couldn’t throw one at someone from the other side of the pool, for instance but they are soft, delicious and a little crumbly.

And they taste of chickpea. Enhanced with a few herbs, spices and harissa. Perfect. You just need a little tahini yoghurt sauce and a squeeze of lemon.

Spiced Chickpea Falafel Cakes with Tahini Yoghurt Sauce

Serves 3, makes about 9, vegan, (without the sauce) gluten-free.

Prep time: 15 mins Cooking Time 30 mins

  • 1 tin/jar cooked chickpeas (400 gr), drained, rinsed & dried
  • 50 g of fresh peas (not frozen too wet) optional
  • 25 g hazelnuts, chopped (optional)
  • 1/2 small onion, finely chopped
  • 2 cloves garlic, finely chopped
  •  a big handful of chopped fresh herbs, I used, mint, coriander, parsley & oregano
  • 1/2 tsp or more harissa paste
  • 1/2 tsp ground cumin
  • 1/2 tsp ground coriander
  • 1/2 tsp ground cinnamon
  • 1/2 tsp sumac (optional)
  • 1 tsp honey
  • the juice of half a lemon plus wedges to serve
  • 1 tbsp olive oil
  • 1 tsp salt
  • 1/4 tsp black pepper
  • polenta or cornmeal fro dusting

Put all the ingredients in a food processor and blend until smoothish and it has come together. If you need to, add a bit more lemon juice to get it moving but not a lot. Taste and adjust seasoning. Mould into cakes and put in the fridge to firm up for a while or overnight.

When ready to cook preheat oven to 200 C. Put the polenta on a flat plate and roll the patties in it to lightly coat all sides. Line a baking tray with baking paper place the patties on the tray and brush very lightly with a tiny bit of olive oil. Bake for 30-35 minutes until slightly browned and serve with the tahini yoghurt sauce.

Tahini Yoghurt Sauce

  • 1 pot (125ml) Greek yoghurt
  • 1 tbsp tahini paste
  • the juice of half a lemon
  • a handfull of fresh herbs, chopped I used mint, coriander, parsley & oregano
  •  a drizzle of olive oil
  • salt & black pepper
  • a pinch ground cumin
  • a pinch sumac (optional)

Put all the ingredients in a bowl and whisk to combine. Taste and adjust lemon & salt as necessary.

Serve the falafel cakes with the tahini yoghurt sauce, lemon wedges and some salad leaves. In a flatbread/pita or not, it’s up to you.

I might have to buy a packet mix for falafel just to find out if that’s what they use. Just to prove to myself really. If it’s not I can’t understand it, any ideas?

Rosemary and Garlic Baked Camembert with Honey Glazed Pear and Almonds

17 Apr

This dish was inspired by a picnic lunch we enjoyed at the Bramon Wine Estate just outside Plettenberg Bay. Bramon Wine Estate is a boutique vineyard and it is the first and only Estate that far East of the Western Cape.

Their flagship Sauvignon Blanc wine is called The Crags which is the name of the “town” where the Wine Estate is situated. You couldn’t really call it a town though. It consists of a petrol station and a shop. Which is why it is such a pleasant surprise to find this beautiful place just off the main road. They also have two sparkling Sauvignon Blanc Cap Classiques. I went for the 2008 sparkling ” a  refreshingly clean palate with vibrant mousse and an exciting, limey, zesty lingering finish”. It was one of the best sparkling wines I have tried in a long time.

So I had another glass. As you do.

In the summer they offer a picnic lunch amongst the vines. It is a really special feeling to be drinking the wine that is growing all around you. It is a relaxed, informal dining experience (in a really good way). You order your drinks and then get a list of the foods available. You trick the boxes next to what you would like to order and then give it back to the very capable waiting staff. Sit back relax, enjoy your drink and the beautiful surroundings while your picnic is freshly prepared for you.

We chose the mini baked camembert with honey figs and nuts, a beautiful plaited bread with rosemary and sea salt, green fig preserve, avocado and parmesan crisp salad, fresh pesto with mixed herbs and almonds, sundried tomatoes and a creamy hummus.

There is a monkey park and a bird sanctuary very near to the Wine Estate, so in a very organised fashion we went to Bramon in the morning to book a nice table in the vines for lunch at 1pm and then went off to Monkeyland for the rest of the morning. You get a guided walking tour around the forest that is very informative for kids and adults. More than 450 primates live and free-roam around the forest. It is an amazing feeling to be that close to so many different types of monkeys and lemurs that are living in a natural habitat. 

After lunch we went to Birds of Eden which is the largest free flight bird aviary in the world. It is a great way to spend a a couple of hours, there are 3500 birds out in the open. You walk up wooden walkways that snake their way through ruins and waterfalls up into the canopy of the trees. It is a stunning place.

And again you get so close to them.

Monkeyland and Birds of Eden are next to each other so you can buy combination tickets for both, which is what we did. With an excellent lunch at Bramon in between of course. Which brings me back to the food.

I contacted Bramon to get the recipes for the baked camembert and the rosemary plaited bread. The gave me the camembert but then told me that the bread recipe was a secret! I can understand it of course, it was very good.

So I made my own version of the bread using spelt flour which I flavoured with roasted garlic and rosemary. It was lovely, especially dipped into the oozing  baked camembert.

I will give you the bread recipe in my next post but for now here’s the baked camembert. I used pears rather than figs because figs aren’t in season here yet and I had some in my fruit bowl.

 I also studded the cheese with sliced garlic and rosemary sprigs before baking it because we used to serve it like that when it was on the menu at the restaurant. It’s something I saw Jamie Oliver do somewhere that makes such a difference to the flavour.

Rosemary & Garlic Baked Camembert with Honey Glazed Pear & Almonds

serves 2, vegetarian, gluten-free

Prep time: 5 mins Cooking time: 30-35 mins

  • 1 boxed camembert (250 gr) wooden box is best but card is fine
  • 1 clove garlic, peeled and finely sliced
  • a few tops of fresh rosemary
  • olive oil

Preheat the oven to 180C, remove the paper wrapping from around the cheese and put it back in the box. Make little slits all over the top of the cheese with a sharp knife and push in the slices of garlic and rosemary tops.

Drizzle with a little olive oil and bake for 30-35 minutes until soft and melting inside. Meanwhile make the honeyed pear and almonds.

Honey Glazed Pear & Almonds

serves 2, vegetarian, gluten-free

  • 1 pear, cored and sliced into 12 wedges
  • a squeeze of lemon juice
  • 1/2 tsp finely chopped fresh rosemary
  • a drizzle of olive oil
  • a handful of whole toasted almonds (I used salted)
  • salt & black pepper
  • about 1 tbsp honey (rosemary honey if possible)

Toss all the ingredients apart from the honey together in a small bowl until evenly coated. Heat up a small frying pan over a medium high heat and throw in the pear & almond mix. Brown/caramelise slightly on both sides before adding the honey and stir to coat the pears.

Cook until the pears are soft but not mushy and remove from the heat.

Serve the warm honey glazed pear and almonds with the baked camembert and a nice bread for dipping. Or wait for my Roasted Garlic & Rosemary Braided Spelt Loaf in my next post…

For more information about the Bramon Wine Estate visit their webste here.

Enjoy!!

Mushroom Risotto Spring Rolls, Manchego Thyme Crisps, Roasted Garlic Watercress Mayonnaise

22 Mar

This recipe is inspired by an amazing meal we had at La Colombe in Contantia Uitsig. La Colombe has always been very special to us ever since the first time we visited about five years ago. We had such a great time that we both agreed that it was the best restaurant we had ever been to.

The thing is that it had reached such an iconic status in our memory that I was secretly worried that it wasn’t going to live up to our very high expectations this time. I was actually preparing myself for disappointment.  Silly me, this time actually exceeded my expectations by quite a long way.

The food is, well you can work it out for yourself. This was how it went….

Amuse Bouche: caramelised onion tart with goat cheese, parsnip soup (in an egg-shell), pea salsa

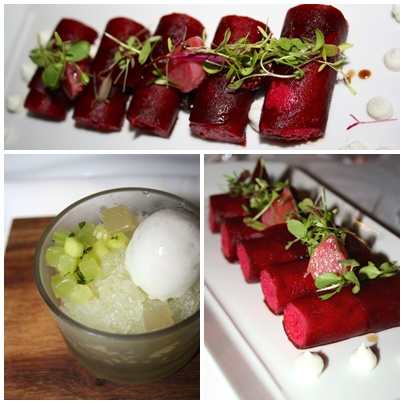
Starter: Beetroot Cannelloni, beetroot mousse wrapped in pickled beetroot, toasted olive brioche, roasted golden baby beets, fromage blanc, poached raisins, 12 yr old balsamic drizzle

Palate Cleanser: Granny Smith Sorbet, pimms foam, cucumber, mint

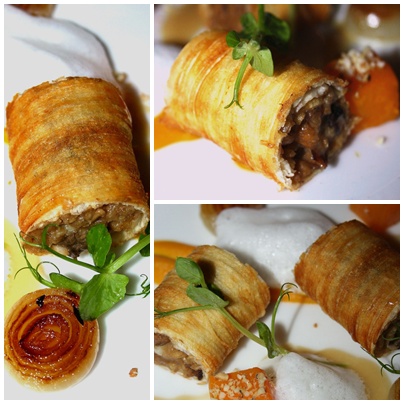
Main Course: Wild Mushroom Risotto Spring Roll, butternut puree, sous vide butternut, caramelised onion, smoked garlic veloute, thyme foam.

Desserts: Coconut & Rosewater Panna Cotta, rose meringue, rose foam, turkish delight, cashew nut streusel  

Chocolate Peanut Butter Terrine, candied cranberries, apricots, peanuts, chocolate, pistachio nut dust

And if that is not enough for you, they bring around a wooden trough filled with petits fours. Okay it’s not a trough but that’s what we called it. Bring me the trough!!!

Petits Fours: Rose Turkish Delight, mini citrus madeleines, maple meringues, cinnamon marshmallows and espresso pistachio dusted chocolate truffles filled with salted caramel.

Yes, that was espresso pistachio dusted chocolate truffles filled with salted caramel. They didn’t last very long, someone at our table may have stuffed his face with them before I could stuff mine. Not mentioning any names but you know who you are…

I don’t think I need to say that the food was outstanding do I? The beetroot cannelloni was light, elegant, sweet and exquisitely made. The mushroom spring rolls were rich with truffle butter and earthy morels, the pastry was perfectly crisp, I didn’t want it to end.

The desserts were a complete triumph. Everything a dessert should be, playful, sweet and nostalgic with a grown up twist.  The attention to detail is what makes this an unforgettable dining experience. From the amuse bouche (very amusing), the palate cleanser (I mean Pimms!!), all the way through to the petits fours (bring me the trough and leave it please).

Speaking of attention to detail I have to mention that the level of service we received was actually on another level to anything I have ever experienced before. Jennifer and her highly knowledgable team made our evening a complete joy from start to finish. The waiter actually explained each dish on the menu FROM MEMORY! All those foams, purees and veloutes without reading from a notepad. That deserves a mention by itself.  And it is not at all stuffy, that’s what makes it so enjoyable, it is proper fine dining without the squeaky chairs and pretension.

Can you tell that I loved it?

I managed to acquire the recipe for the Mushroom Risotto Spring Rolls from the very talented chef, Scot Kirton. Mine is a simplified version as you can see from the description. I don’t have  a syphon thingy to make foams but I wouldn’t mind if anyone out there wants to send me one. I made some Manchego Thyme Crisps instead.

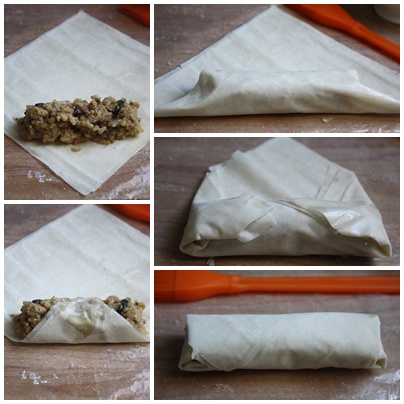
You could use spring roll wrappers to make these, I used a double layer of filo and Scot uses a special Asian pastry that I am desperate to get hold of. Either way you roll them like this:

I couldn’t get any truffle butter or morels so I used a mix of dried mushrooms, soaked in boiling water for about 20 minutes and some fresh chestnut or cremini mushrooms. The advantage of using dried mushrooms is that you can use the mushroomy soaking liquid with the stock to give the risotto a deeper colour and flavour.

Mushroom Risotto Spring Rolls

Makes about 12 rolls, vegetarian. Adapted from the La Colombe recipe

The risotto needs to be chilled before you roll it so it is best to make it the night before and refrigerate overnight.

Prep time: 45 -60 mins (not including chilling time) Cooking time: 15-25 mins

  • 150-200 gr fresh mushrooms, chestnut/cremini/portobello/morels roughly diced
  • 25 gr dried mushrooms, soaked in boiling water for 20 mins (reserve soaking liquid) then chopped
  • 2 tbsp olive oil
  • 1 onion, finely chopped
  • 3 cloves garlic, finely chopped
  • salt & black pepper
  • 30 gr white truffle butter (optional)
  • a bunch sprigs fresh thyme, leaves removed and chopped
  • 250 gr risotto rice
  • 250 ml white wine
  • about 1 litre veg stock plus the mushroom soaking liquid
  • 50 gr parmesan/manchego, finely grated
  • 1 packet filo pastry/spring roll wrappers defrosted
  • olive oil for brushing

In a large pan, fry the chopped fresh mushrooms and thyme in a tablespoon of hot oil until nicely browned. Tip them into a bowl. Add another tablespoon of oil to the pan over a medium heat and cook the onions for about 4 mins until translucent then add the garlic and cook for another minute. Add the rice and stir to coat in the onions for a minute.

Put the stock and mushroom soaking liquid in a small pan over a medium heat and keep hot but not boiling.

Add the wine and soaked mushrooms and cook until most of the liquid has disappeared. Add a ladle full of the hot stock to the rice and swirl the pan until all the liquid is absorbed. Add another ladle full swirl until it is absorbed and continue on like this until the rice is cooked.

Stir through the cooked mushrooms and truffle butter (if using). Taste and adjust seasoning. Stir through the grated cheese, remove from the heat. Leave to cool then chill in the fridge, overnight if possible. What I did was make the risotto for dinner, reserved about half for spring rolls for lunch the next day.

Cut a double layer 20 cm square of filo pastry (or use spring roll wrappers) and lay in a diamond shape on a board in front of you. Mound 2 or 3 tbsp of risotto onto the pastry and roll up following the pictures above brushing with olive oil to make them stick.

Preheat the oven to 190 C. Line a baking tray with parchment paper, place the spring rolls on the tray, brush the tops with olive oil and bake for 15 -25 minutes depending on size. You can also deep-fry them.

Roasted Garlic, Watercress Mayonnaise

Enough for 2 people, vegetarian

  • 2 tbsp good mayonnaise
  •  a squeeze of lemon juice
  • a handful of fresh watercress (or parsley)
  • 1 large garlic clove (unpeeled)
  • 1/2 tsp olive oil
  • salt & pepper

Roast the garlic clove in its skin in a hot oven for about 15 minutes (I did it with the spring rolls). Put the peeled roasted clove with the rest of the ingredients in a measuring jug and puree with a stick (immersion) blender until smooth. Taste and adjust seasoning/lemon.

Manchego Thyme Crisps

Makes about 6, vegetarian

  • 50 gr manchego or parmesan, finely grated
  • a few sprigs of fresh thyme, leaves removed and chopped

Preheat the oven to 200C and line a baking tray with parchment paper. Mix together the cheese & thyme. Put a heaped tablespoon of the cheese on to the baking tray and flatten & spread out slightly. Leave about 1/2 inch between each circle.

Cook for 3-5 minutes until golden brown and bubbling. Leave to cool if you want flat discs and remove carefully with a metal spatula.

If you want you can mould them gently around a rolling-pin while still hot to make them curved.

Enjoy!!

 For more information on La Colombe and Constantia Uitsig visit their website here.

Thanks to everyone at La Colombe who made our evening so special. Hopefully it won’t be too long before the next time…..


Mexican Tortilla Lasagne with Roasted Salsa Verde

10 Dec

This is the best vegetarian lasagne you’ll ever make. High praise I know, there’s nothing like setting yourself up for a fall but I really believe it. Lasagnes are one of those meals that have been done to death, diluted and destroyed by frozen food manufacturers.

When we first opened the restaurant, one of the things that I promised myself is that we would never serve a vegetable lasagne as the vegetarian option. It is the fallback/default veggie option in many restaurants and I think it’s just lazy. Most of them are a frozen, watery, disgusting, flavourless disgrace. Enough ranting…. I also said we would never serve chips or Traditional Sunday Lunch, ha! That didn’t last very long, Sunday lunch was the best thing we ever did and chips are what the people want. It was a steep learning curve.

Continue reading

food to glow

feel good food that's good for you

Pease Pudding

Just another WordPress.com weblog

Chica Andaluza

Sometimes Up a Mountain in Andalucia and sometimes Down by the Sea on the English South Coast

Agrigirl's Blog

Placemaking for Healthier Communities and a Healthier Planet

for the love of yum

A girl who loves to cook fresh, fun, and global cuisine.

The Path To Authenticity

Mind, Body & Spiritual Growth