Savoury Tomato Cobbler with Basil and Manchego

26 Sep

Tomato & Basil CobblerIt’s been so long since I posted a recipe I’m sorry. I have so many recipes to catch up with but no time, which is a good thing I suppose. Fresh To Go is really busy which is more than we could have hoped for. Thank you customers!

Savoury Tomato & Basil Cobbler

It is still summery here but I realise that in other parts of the world it can’t make up its mind and is sometimes raining and cold. This recipe is perfect because it makes the transition from a light summery dish to cosy comfort food very easily indeed. Just serve it with a nice rocket salad if the sun is out or some yoghurt & herb mashed potatoes if the weather and/or you are miserable. Mashed potato is a well known antidote to misery.

Tomatoes are cheap & plentiful here and also full of flavour. This recipes uses 3 different types of tomato, plum tomatoes, beef tomatoes and cherry tomatoes but you don’t have to. Cooking the tomatoes encourages flavour even out of the most out of season, cold  & dull specimens.

Tomato Basil & Manchego Cobbler
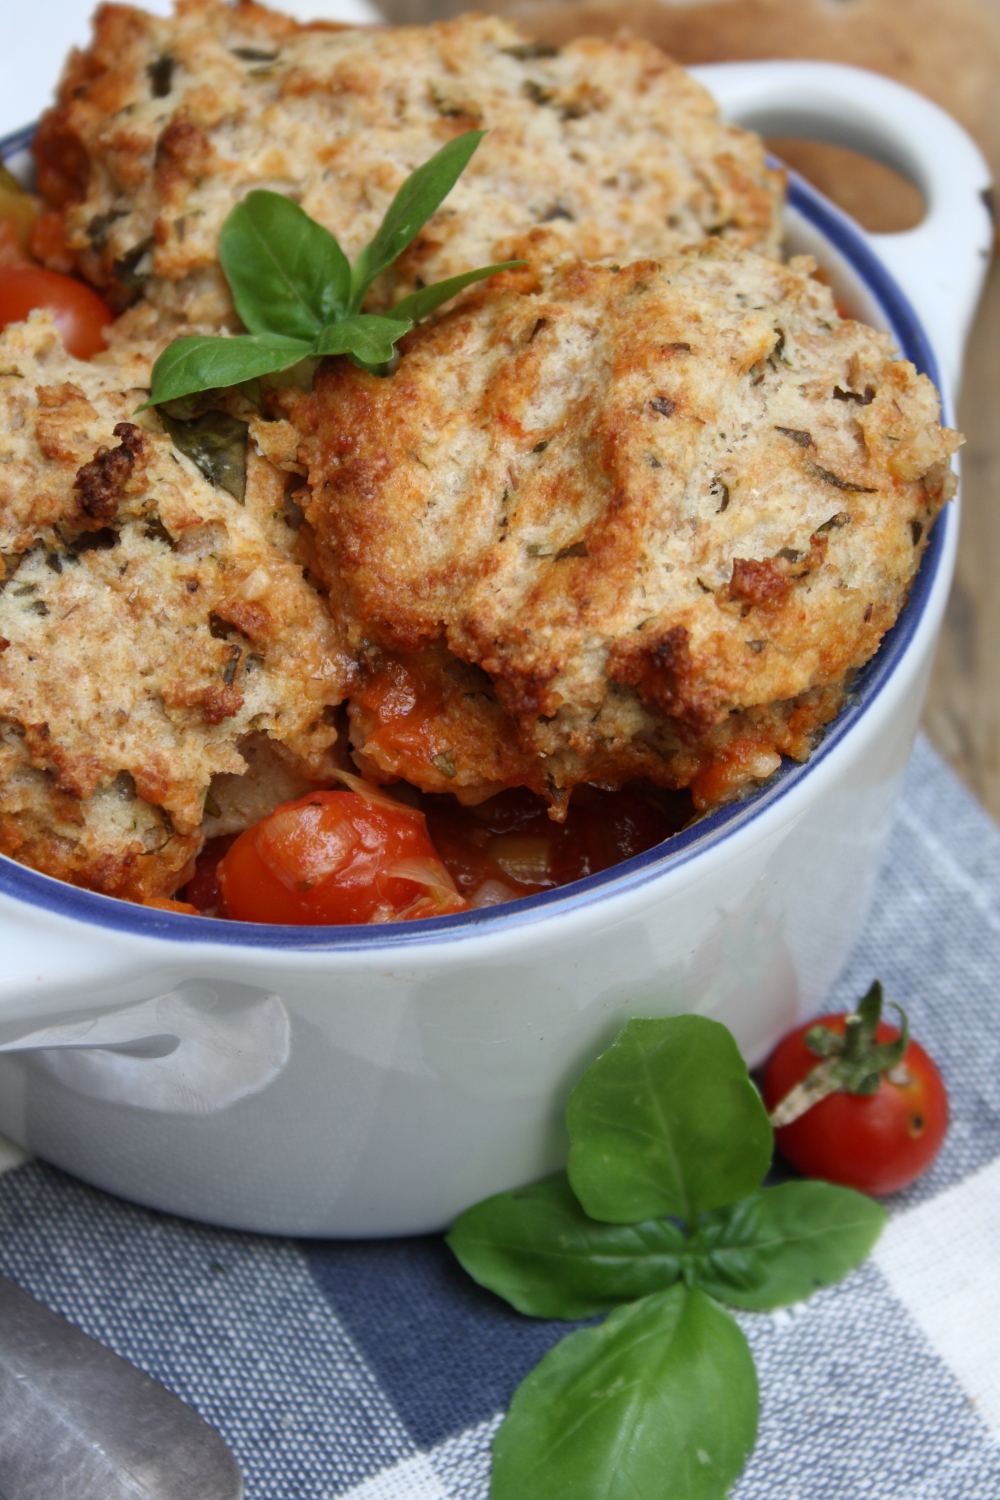
Savoury Tomato Cobbler with Basil & Manchego Recipe

Serves 6-8, vegetarian. 

  • 1 onion, chopped
  • 4 plum tomatoes, halved lengthwise, white core removed
  • 1 kilo beef (Castellano) tomatoes, chopped (or any tomatoes)
  • 500 g cherry tomatoes, halved
  • 3 cloves garlic, finely chopped
  • 1 Tbsp sherry vinegar
  • a pinch of dried chilli flakes
  • 1 tsp dried or fresh thyme
  • a squeeze of honey
  • 1 tsp Worcestershire sauce (vegetarian)
  • about 10 fresh basil leaves, rolled up & julienned (you will need more for the dough mix too)
  • 1 Tbsp cornflour
  • 1 tsp salt
  • 1/2 tsp black pepper
  • 1 1/2 cups (225 g) wholemeal spelt flour (or other flour)
  • 1/2 cup (75 g) cornmeal/fine polenta/masa harina 
  • 1 tsp baking powder
  • 1/2 tsp baking soda
  • 1/2 cup (110 ml) olive oil
  • 3/4 cup (100 g) finely grated Manchego (or Parmesan) cheese
  • a good handful of basil leaves, rolled & julienned
  • 1 1/4 cups (275 ml) goats (or Greek) yoghurt or buttermilk

Preheat the oven to 180C.

Cook the onion in 1 Tbsp of olive oil in a large pan over a medium heat with a pinch of salt until softened, about 4 minutes. Add the garlic, chilli flakes & thyme and cook for 2 minutes more. Add the chopped tomatoes, cook for 5 minutes then add the vinegar, Worcestershire sauce, cornflour, salt, pepper and honey. Cook for 5 minutes more. Taste and adjust salt & honey as required.

Place the halved plum tomatoes, cut side up in the bottom of a 9 x 13 inch baking dish (or 1 half in each individual dish if you have them), then spoon the cooked tomato, onion mixture over them. Top with the halved cherry tomatoes. Bake for 10 minutes.

Meanwhile mix together the flours, baking powder & baking soda in a large bowl and season with salt & black pepper. Drizzle over the olive oil and then crush it into the flour using a fork until it is evenly distributed and resembles crumble mix. Put it in the fridge for 10 minutes.

Stir the grated cheese & basil into the flour mix, then add the yoghurt and stir until just combined. Do not overmix or it will be tough. Dollop small roundish handfuls of the mix on top of the tomatoes, leaving gaps in between, do not spread to cover.

Bake for 30 – 35 minutes until golden brown. Leave to cool for 10 minutes or longer before serving with either a green salad and/or yoghurt & herb mashed potatoes.

Tomato, Basil & Manchego Cobbler

I am off to Rome to meet up with my Dad this weekend. For research purposes only you understand. Very excited about the food, I have a long list of restaurants I want to try. I’ve heard there’s some sights to see too. Only if there’s time between lunch & dinner though…

Natalie

Fresh Fig and Amaretto Clafoutis

12 Aug

s4I love fresh figs. I love the smell of them when they are on the trees. It smells like coconut sun cream when I run past them with the dog. Like Hawaian Tropic. I also think Jo Malone’s perfume, Wild Fig & Cassis, smells like coconut too. That’s my favourite summer fragrance, in case you were wondering. Which you weren’t. That and Clarins Eau Dynamisante.

fig

So back to figs. That actually may be the smell of them rotting on the ground. That’s the thing with fig trees, you always end up with a glut of figs. We are coming to the end of the early season figs here at the moment called “Brevas”. They are larger and darker coloured whereas the later season ones “Higos”, that are starting to ripen now, are smaller and light green.

brevas close

So what do you do with a mountain of fresh figs? I do have a lot of recipes using fresh figs like this Fiery Fig Chutney, this Fresh Fig & Goats Cheese Quiche, and this Fresh Fig & Almond Ice Cream.

Fresh Fig & Amaretto Clafoutis

But my favourite at the moment is this clafoutis. It’s quick, easy and not at all bad for you really. Amaretto aside, of course. But a world without Amaretto would be a much sadder place don’t you think?

Fresh Fig & Amaretto ClafoutisFresh Fig & Amaretto Clafoutis Recipe

Makes 3 small individual, double recipe for 1 large one

  • 2 large eggs, separated
  • 4 Tbsp honey
  • 1 Tbsp wholemeal spelt flour
  • 1/2 Tbsp ground almonds
  • 165 ml (3/4 cup) goat’s (or Greek) yoghurt)
  • grated zest of 1/4 orange
  • a pinch of salt
  • 1 tsp vanilla extract
  • a few drops of almond essence
  • 2 tsp amaretto liqueur
  • 2 or 3 figs quartered
  • flaked almonds

Preheat oven to 180C and oil & flour your tins or terracotta dishes.

Separate the yolks and the whites into 2 bowls. Whisk the yolks and honey until pale and creamy. Gently fold in the flour & ground almonds and stir in the yoghurt, essences, amaretto, salt & orange zest.

With an electric whisk, whisk the egg whites until firm and fluffy like meringue. Add a little of the whites to the other mixture to loosen it then carefully fold in the rest of the whites trying not top deflate them too much. When the white is incorporated into the rest, pour the mixture into the prepared dishes and top with the pieces of fig.

Bake for about 15 minutes then scatter over a few flaked almonds and bake for another 5 minutes until cooked. Longer for a large clafoutis.

Serve warm or at room temperature.

Fresh Fig & Almond Clafoutis

Enjoy!!

Natalie

Fresh To Go! Courgette Flower and Leek Quiche with Goat’s Ricotta and Parsley

30 Jun

Courgette Flower Quiche

“Where the **** have you been?” I hear you ask in my guilt ridden dreams just before morning.

So I promise myself over and over again that today will be the day that I actually blog some of the recipes that I have been developing, cooking and selling (Yes actually selling) over the past few months. But then life takes over again and I run out of time.

Forgive me Father for I have sinned. It has been seven weeks since my last blog. Seven weeks! It feels terrible just typing it.

Courgettes & Flowers

My explanation is as follows:

We have set up a small catering company called “Fresh To Go” supplying naturally delicious & healthy prepared foods, in our local area. It is for people who really want to eat healthily but don’t have the time, skills or inclination to cook for themselves every day.

We send out a newsletter every Friday detailing the dishes (with photographs obviously) on the following week’s menu. It is just an extension of this blog really. I go to the farmer’s market in Coin on Sunday and look at which natural fruit and vegetables are in season and looking gorgeous and create recipes using them. The only difference being is that now we make food for other people too. Sounds simple doesn’t it?

And it is, sort of. The thing is that it doesn’t leave much time for blogging, so I apologise for neglecting you and hope that this beautiful little quiche, made with the best of this season’s produce, will go someway towards making it up to you.

If you are living in or visiting the Malaga area and would like to receive weekly updates of what’s cooking in our kitchen
Subscribe to our newsletter

Courgette Flower Quiche

Courgette, Leek & Courgette Flower Quiche with Goat’s Ricotta & Parsley

Makes 1 large or 3-4 small quiches, vegetarian

For the pastry crust:

  • 150 g wholemeal spelt (or normal) flour
  • 50 g oats
  • 50 g walnuts, blended to a course powder
  • 1/2 tsp salt
  • black pepper
  • 1/2 tsp dried thyme
  • 4 Tbsp olive oil
  • 80-100 ml cold water
  • 1 egg white for glazing (save yolk for filling)

Mix together the flour, oats, walnuts, salt, pepper & thyme in a large bowl with a fork. Then add the olive oil and, using the fork, mix it into the dry ingredients, mashing it together so it is evenly distributed and resembles crumble.

Then slowly drizzle in the water (you may not need all of it) mixing it with the fork until it starts coming together. Using your hands bring it together into a ball and knead gently just until it holds, don’t overwork it. It will be slightly crumbly.

Preheat oven to 200C. Oil and flour a 9 or 10 inch tart tin/dish or 3 or 4, 4-5  inch tart cases and line the base with a circle of baking paper.Flour you work surface  and rolling-pin and roll out your pastry to a flat disc about 3-4 mm thick and big enough to line your tart case(s).

Using your fingertips and heel of your hand press it into and up the sides of the tin. A flat-bottomed mug can be quite useful too. When you have the base reasonably even, trim off any bits hanging over the edge and use them to fill any holes. Put in the fridge for at least 10 minutes to firm up.

Place a sheet of  baking paper in the tin, fill with baking beans and bake for 8-10 mins. Remove from the oven, brush the base with the egg white and put back in for two minutes – this should stop it getting a soggy base. Leave to cool while you make the filling.

For the filling:

  • 1 courgette, thinly sliced on the slight diagonal
  • 1 leek, trimmed, halved lengthways, rinsed & sliced
  • 1 green spring garlic (or clove), trimmed and sliced
  • 4 courgette flowers (stamens snipped out) if baby courgettes still attached slice them too
  • 1/2 tsp thyme
  • salt & black pepper
  • a pinch of dried chilli flakes
  • 1 egg yolk (saved from above)
  • 2 eggs
  • 1 pot (125 ml) goat’s or Greek yoghurt
  • rice milk (or your choice of milk)
  • about 100 gr goat’s ricotta (or Greek Feta) 
  • a handful of fresh parsley, chopped

Preheat oven to 190 C. Heat 2 Tbsp olive oil in a pan and saute the leeks, courgettes (and baby courgettes if you have them) & spring garlic with a good pinch of salt, black pepper, thyme, chilli flakes. Stir occasionally until the courgettes are well softened. Taste for seasoning and drain for a few minutes on kitchen paper to get rid of any liquid.

Cover the pastry base with an even layer of the courgette & leeks then crumble over the ricotta/feta. In a measuring jug whisk together the egg yolk, eggs and yoghurt. Add in enough milk to take it up to about 400 ml (more if your tin is deep), season well with salt & black pepper, throw in the chopped parsley and whisk again.

Place the quiche on the middle shelf of the oven then whisk and quickly pour in the liquid up to a few mm below the edge. Slide in the tray carefully to avoid spillage and shut the oven door.

Bake for about 25 – 30 minutes, check how it is cooking and add the flowers to the top when it is nearly cooked. Put back in for another 5 or so minutes until the flowers have wilted slightly and the quiche is browned and set in the middle.

Courgette Flower Quiche


My apologies again for the extended absence but cross your fingers for us that  this is a success!

imagesCAFT0O3W

Broad Bean Bruschettas with Goat’s Ricotta and Spring Onion

11 May

Broad Bean Bruschettas with Goats Ricotta

I have been running past these broad beans with the dog and I kept meaning to go back with my camera to take some photos. I eventually remembered and got stung by a bee on my little finger when I did. I had forgotten how much that hurts. The things I do for you…

Broad Beans

I also photographed some spring onions (Spanish ones are massive in case you were wondering) and some young leeks. These three things are cheap and plentiful at the market right now as well as spring garlic shoots.

Broad Beans, Spring Onions & Leeks

So this is less of a recipe and more of a, placing of ingredients on some toasted bread, really. You can do that even if you have guests, which we did. The good thing about that is that you can get them to help with the podding. (Thanks Lindsey)

Broad Bean Bruschetta

I bought a kilo of broad beans so sharing the job was a good idea. Podding the beans is the first part then you blanche them for a few minutes in boiling water, cool them down under cold running water, then you squeeze the bright green, sweet beans out of their pale jade cases.

This may sound like a faff too far but it is hardly taxing (while sipping a cool drink under an umbrella) and it really makes all the difference to the freshness of the dish. Look at the colour of them, aren’t they pretty?

Broad Bean Bruschettas

Broad Bean Bruschettas with Goats Ricotta & Spring Onion Recipe

Serves (who knows depends how hungry you are) 4-6? Vegetarian

  • 1 kilo broad beans still in their pods
  • a handful of finely sliced spring onions
  • a handful of rinsed, finely sliced baby leeks (or small leek)
  • a handful of finely sliced spring garlic/green garlic
  • dried (or fresh) thyme leaves
  • lemon juice
  • a handful of fresh parsley, chopped (plus leaves for garnish)
  • olive oil
  • sea salt & black pepper
  • goats ricotta (or soft goats cheese/feta)
  • a nice baguette/ciabatta (or 2) sliced on the diagonal

Pod the beans then cook in boiling salted water for 2 minutes. Plunge into cold water to stop the cooking or run under the cold tap until cold. Then squeeze the bright green beans out of their pale green cases.

Toast the baguette slices on both sides under the grill and set aside.

Heat 1 Tbsp olive oil in a frying pan over a medium heat, add the sliced spring onions, leeks and green garlic. Season with salt, pepper and a little thyme. Cook for a minute or so until starting to soften, then add the broad beans, stirring to coat. Cook for a few minutes more, add a squeeze of lemon juice, the chopped parsley and check for seasoning.

Spread or crumble a layer of goats ricotta/cheese on each baguette slice, top with a spoonful of the broad beans and put on your serving plate. Continue with the rest.

To serve, top with some fresh parsley leaves, a sprinkling of sea salt and a few drops of olive oil.

Broad Bean Bruschetta with Goats RicottaI’m thinking a long, cool white wine spritzer to go with this. You may prefer a Mojito though.

I know I said I would let you know about our new business venture in this post. Well I lied. You’re gonna have to wait.

Have a lovely weekend!!

imagesCAFT0O3W

Roasted Beetroot Tart with Goat’s Cheese, Walnuts, Oatmeal Crust

3 May

Beetroot, Goats Cheese & Walnut Tart

Sorry I’ve been neglecting you recently. It’s not that I don’t love you any more it’s just that I’ve been really busy with life and people and working on an exciting new business venture that I am desperate to tell you all about.

But not just yet…

Beetroot, Goats Cheese & Walnut Tart

First a recipe, because that is why you are here after all. You’re obsessed with food probably, like I am.

I buy beetroots from the market, then I roast them and then I decide what I am going to do with them. Roasted beetroot is a great thing to have in your fridge. You can just add it to a salad with some goat’s cheese & walnuts (classic flavour combinations) if you can’t be bothered with the whole “making the tart” thing or are pushed for time. You can puree it with some chickpeas to make this brilliantly bright magenta coloured Beetroot Hummus, or blend it with some stock into this stunning  Spiced Beetroot Soup.

Roasting Beetroot

I had pinned this recipe for a Beetroot, Goats Cheese & Walnut Tart on to my Food I Want To Make My Own board and remembered a recipe for a tomato tart with a walnut oatmeal crust that I had cut out of a magazine. You know when you want to find something and you find everything but that one thing?

Anyway, I did eventually find it in  a pile of papers in a draw. This crust is a bit like a cheesecake base if you know what I mean, the oats, wholemeal spelt flour and finely chopped walnuts are mixed with olive oil to make a base that you press into the tart case with your hands and push it up the sides.

It’s worth the hassle. You get a slightly thicker than normal, rustic, nutty, crumbly biscuity base that is perfect with the goats cheese & beetroot. And it makes a nice change.

Walnut Oatmeal Crust

Roasted Beetroot, Goats Cheese & Walnut Tart with a Walnut Oatmeal Crust

Serves 4-6 vegetarian. Adapted from Alexandra Cooks

Roasting beetroots:

  • 3 or 4 tennis ball (or smaller) size beets (you may not need it all for this recipe)
  • olive oil salt & pepper, dried or fresh thyme

Preheat oven 200C. Trim the beets, leaving the root and about 2 inches of stalk still attached, if possible, then wash them gently to get rid of any mud. Dry them and put them on a lined baking sheet, drizzle with olive oil and season with salt, pepper and thyme. Roast for 45-50 minutes (depending on size) until tender all the way through.

Leave until cool enough to handle and, using gloves, cut off the roots and stalks then rub off the skins with a small knife. They should come off easily. Remember, beetroot stains, so be careful.

For the pastry crust:

  • 135 g wholemeal spelt (or normal) flour
  • 65 g oats
  • 50 g walnuts, very finely chopped
  • 1/2 tsp salt
  • black pepper
  • 1/2 tsp dried thyme
  • 4 Tbsp olive oil
  • up to 120 ml cold water

Mix together the flour, oats, walnuts, salt, pepper & thyme in a large bowl with a fork. Then add the olive oil and, using a fork, mix it into the dry ingredients, mashing it together so it is evenly distributed and resembles crumble.

Then slowly drizzle in the water (you may not need all of it) mixing it with the fork until it starts coming together. Using your hands bring it together into a ball and knead gently just until it holds, don’t overwork it. It will be crumbly. Wrap in cling film and put in the fridge for 15 minutes. Meanwhile, caramelise the onions…

For the filling:

  • 1 large red onion, finely sliced
  • salt & pepper
  • thyme
  • balsamic vinegar (or balsamic syrup)
  • honey
  • a splosh of red wine or sherry
  •  a handful of walnuts, roughly chopped (40 g)
  • 2 large eggs
  • 1 pot (125 ml) goats (or greek yoghurt)
  • rice milk/oat milk/goat milk (or you choice of milk)
  • 75 – 100 g goats cheese, crumbled
  • fresh dill or parsley to serve

Cook the sliced onions in a frying pan in a few tablespoons of olive oil over a medium high heat with the salt, pepper, thyme, a drizzle of balsamic & a squidge of honey, stirring occasionally until starting to soften, caramelise and stick to the pan, about 8 minutes. Add a splosh of wine or sherry to deglaze the pan and scrape any sticky caramelised bits off the bottom. Cook for a couple of minutes more to cook off the alcohol and reduce any liquid. Leave to cool while you prepare the pastry.

Preheat oven to 200C. Oil and flour a 9 or 10 inch tart tin/dish. Flour you work surface  and rolling-pin and roll out your pastry to a flat disc as thin as you can go. This is quite tricky because of the walnuts. I gave up and started to press the disc into the tart tin with my hands. Using your fingertips and heel of your hand press it out and up the sides of the tin any way you can! A flat-bottomed mug can be quite useful too. When you have the base reasonably even, trim off any bits hanging over the edge and use them to fill any holes.

Prick all over the base with a fork and bake the pastry case for 10-12 minutes, remove from the oven and lower the heat to 180C.

Spread the caramelised onions evenly over the base then chop 2 or 3 beets into chunky cubes. Scatter these evenly over the base too. You may not need it all. Tumble over your walnuts.

In a measuring jug whisk together the eggs, yoghurt, salt & pepper. then add enough milk to take it up to about 400 ml and whisk together again.

Have you crumbled goats cheese ready, open the oven door and slide out the tray, place the tart on the tray then pour the milk mixture evenly over the filling, top with the crumbled goats cheese and carefully push the tray back in the oven. This should stop any spillage.

Cook for 35-40 minutes until puffed and golden. Leave to cool for about 10 minutes before serving sprinkled with fresh dill or parsley and a green salad on the side. It is also lovely served at room temperature for a picnic.

Beetroot Goats Cheese Walnut Tart

All it needs is a nice glass of wine to go with it. Any suggestions?

I will tell you all about our new business venture in my next post…..

Enjoy the long weekend!

imagesCAFT0O3W

Primavera Orzo Salad with Fresh Peas, Asparagus, Mint and Feta

22 Apr

Primavera Orzo Salad

Spring has definitely sprung. The wild flowers are wafting their sweet fragrance in the mornings where I run with the dog so my thoughts turn away from steaming hot soups and comforting stews towards lighter flavours and all things fresh and green.

Spring Flowers

I bought some fresh peas in their pods from the farmers’ market on Sunday. There is nothing more spring-like than peas, except for maybe asparagus. This recipe has both. In fact it has all my favourite spring flavours in one dish. There’s also fresh mint, dill, lemon, spring onions, spring garlic and feta. Is it singing to you yet?

s3

Orzo, in case you don’t know, is a rice shaped pasta. If you can’t find it (I got mine in Eroski, believe it or not, in the Moroccan section) you could use any small-ish pasta shapes or even cooked rice. The good thing about orzo is that it doesn’t go all flabby and stick together when it is cooked so it is perfect for salads.

s4

You toss all the ingredients and the dressing over the cooked orzo while it is still hot so all the flavours get absorbed and start to mingle. Leave it to cool to room temperature then you can store it in the fridge. The feta and fresh herbs are best stirred through just before serving. This is an ideal lunch that would be easy to take to work or for a weekend picnic.

s5

Primavera Orzo Salad with Fresh Peas, Asparagus, Mint & Feta Recipe

Serves 3, vegetarian.

  • 300 g uncooked orzo (or other pasta shapes)
  • 2 or 3 spring onions (scallions), finely chopped
  • 1 baby leek (or more spring onion), finely chopped
  • 1 spring garlic/green garlic/ajete, finely chopped
  • salt & black pepper
  • 1/2 tsp dried thyme
  • 1/2 tsp dried oregano
  • a pinch of dried chilli flakes (optional)
  • 2 Tbsp olive oil
  • 2 Tbsp lemon juice
  • 1 bunch asparagus
  • 100 gr shelled fresh peas (or frozen)
  • a handful of fresh chopped dill
  • 12 fresh mint leaves, chopped
  • 100 g Greek feta
  • toasted pine nuts (optional)

Cook the orzo in lots of boiling salted water for about 8 minutes until al dente and drain.

Meanwhile, cook the spring onions, baby leek and spring garlic in a tablespoon of olive oil over a medium heat with a pinch of salt some black pepper, the thyme, oregano and chilli flakes until softened. Mix this with the drained cooked pasta in large bowl. Add the olive oil, lemon juice and season with salt & black pepper. Leave to cool.

Trim or snap the woody ends off the asparagus and cut into 1 inch pieces. Shell the peas. Cook the peas & asparagus in boiling salted water for 3 minutes then drain and add to the orzo, Stir everything together well.

Leave to cool to room temperature. It can be stored in an airtight container in the fridge from this point. When ready to serve stir through the crumbled or cubed feta and the chopped herbs. Taste for seasoning, add more salt or lemon juice if required.

Serve topped with some tiny mint leaves, dill fronds and toasted pine nuts, if using. I forgot to put mine on for the photos, duh…

s6

Say hello to spring even if it is raining where you are!

s8

Have a lovely week whatever the weather.

imagesCAFT0O3W

Avocado Hummus With Coriander and Lemon

27 Mar

Avocado Hummus

We are coming to the end of the Hass avocado season here now and I can’t believe I haven’t shared a recipe with you using my favourite fruit/vegetable yet. Avocados are excellent for helping to lower cholesterol, keeping  your heart healthy, preventing cancer and alleviating symptoms of arthritis.

Avocados on TreeThey are still cheap and plentiful here at the market so I bought a kilo on Sunday. One of my favourite recipes using avocado is this Tricolor Baked Avocado. If you’ve never tried avocado cooked you should, it’s surprisingly delicious.

avocados

This is new recipe to me and I have to say it is definitely a keeper. Two of my favourite dishes fused together in a bowl.  It’s a hummus and guacamole hybrid. It shouldn’t work but it does, brilliantly. And it’s quick, easy, healthy and addictive.

Perfect for a snack or late night supper when you can’t be bothered with anything complicated.

Avocado Hummus

Avocado Hummus Recipe

Serves 2-3, vegan, gluten-free. Adapted from Kiran Tarun

  • 200 g cooked chickpeas (drained & rinsed)
  • 1 large avocado (I used 2 mini ones)
  • 1 large clove garlic
  • 3 Tbsp tahini
  • juice of 1 lemon
  • a big handful of fresh coriander
  • 1/2 tsp ground cumin
  • 1/2 tsp chipotle chilli sauce (optional)
  • salt & black pepper
  • olive oil

Put all the ingredients into a food processor (or use a stick blender) with a splash of olive oil and puree until smooth. You can add more oil if you need to get the right consistency. Taste and check seasoning.

Avocado Hummus

Serve with raw veggies or toasted pita for dipping. You could try making your own flour tortilla or flatbread crackers by brushing them with oil, cutting into triangles with scissors, sprinkling with cumin, salt & pepper and baking at 125C for about 10 minutes until crispy.

Or just spread it on some wholemeal toast, sprinkled with sea salt. Heaven.

Avocado Hummus

If you are a bit of a hummus freak like me. Have at look at this Authentic Creamy Hummus and this Roasted Beetroot Hummus too.

Enjoy!

imagesCAFT0O3W

Kimchi – Korean Chilli and Ginger Cabbage Pickle

25 Mar

Korean Kimchi

I think Kimchi is probably one of those Love or Hate things, like Marmite. I’m definitely a lover not a hater of both. I can see why you would be put off I suppose. I mean it’s fermented cabbage for want of a better description. Kids will love it.

Chinese Cabbage & Korean Chiili Flakes

It’s my new favourite thing. If you have never heard of it, where have you been? It’s a spicy Korean cabbage pickle (or condiment really) that can be used to liven up a huge amount of dishes. There are recipes using it all over the internet for Kimchi Fried Rice and Kimchi Pancakes among other things. It is a really versatile thing to have in your fridge for those “What are we having for lunch/dinner that only takes 15 minutes” moments.

Kimchi

This recipe is healthier than most as it uses an apple for sweetness rather than the evil sugar monster. We like that.

Korean Kimchi

Korean Kimchi Recipe

Makes 1 large jar, vegan, gluten-free, refined sugar-free.

Adapted from Dr Ben Kim & Centre Stage Wellness

  • 1 Chinese cabbage (aka napa cabbage) the long ones (about 500g)
  • 4 Tbsp sea salt
  • about 450 ml (2 cups) warm water
  • 4 Tbsp Korean red chilli flakes/kimchi chilli powder (buy from Asian stores)
  • 1 Tbsp minced garlic (about 3 cloves)
  • 1 Tbsp minced ginger
  • 3-4 spring onions/scallions, sliced 
  • 2 Tbsp fish sauce (optional)
  • 1 large apple
  • 1/2 onion

Discard any outer damaged leaves, separate off all the cabbage leaves, rinse and chop into bite-size pieces. Dissolve the sea salt in the bowl of warm water, pour it over the cabbage and mix it well. Leave it to sit for at least four hours.

Rinse the cabbage well to remove excess salt then put it in a large bowl. Mix the Korean chilli flakes with a few tablespoons of warm water to create a paste, add the minced garlic and ginger and stir together well. Pour this onto the cabbage, stir through the spring onions and fish sauce if using.

Blend the cored apple with the 1/2 onion and about 200 ml (3/4 cup) water then add this to the cabbage as well. Mix everything together really well with a wooden spoon or with your hands (using gloves) to make sure everything is well-distributed.

Transfer the cabbage with a clean spoon into a large sterilised glass jar or bottle, pressing it down well each time as you stack it up. Pour over any liquid remaining in the bowl but leave about 2 inches clear at the top of the jar/bottle before sealing it up. Leave the  kimchi to sit at room temperature for 24 hours.

The kimchi is now ready to eat. Store it in the fridge and it will continue to ferment slowly over time. As long as you use a clean spoon every time you take some out, it should keep for up to a month in the fridge.

Korean KimchiAdd a big dollop of it to vegetable stir fries to add another level of flavour, or to this Soba Noodle Salad or this Mee Goreng. It’s great in Asian style soups with some miso.  I love it sautéed with some broccoli, soy sauce and sesame oil which you can eat with noodles or add the whole lot to an omelette made with a bit of soy sauce or even some scrambled eggs. It is a fantastic thing to have around for food emergencies.

Have I convinced you yet?

imagesCAFT0O3W

Mushroom Risotto Stuffed Baked Fennel Bulbs with Tomato Sauce

20 Mar

Risotto Stuffed Fennel with Tomato Sauce

Fennel is another one of those vegetables, like cauliflower, that gets a bit of a bad name. People have preconceived ideas about it. They don’t like it. But many have never tried it cooked. I may have been one of those narrow-minded people.

Fennel Plants

Running past this field full of feathery fennel fronds floating in the breeze in front of an 11th Century Moorish watchtower while Rufus begs me to turn around and run back because of the pack of very tiny dogs who bark (or actually yap) at his heels as we pass, made me want to research this undervalued vegetable a little more deeply.

And by research I mean, look at recipes. On Pinterest mainly. Not that I’m addicted or anything but that is where I store all of the recipes I like the look of and want to make soon.

Mushroom Risotto Stuffed Fennel Bulb

The idea for this recipe didn’t come from Pinterest though. It came from Jim, The Washer Up’s dad. It’s not his recipe. I don’t think he stretches much farther than a ham sandwich in his own particular kitchen, but he does send me everything food related cut out from the British press, neatly folded in a brown envelope every couple of weeks. This is always a very welcome distraction, for me, from any cleaning that might need doing.

It was in one of those envelopes that I found out about baking and stuffing fennel.

Fennel Stock & Bulbs

Because I bought four whole fennel (complete with long feathery fronds still attached)  from the farmer’s market on Sunday, I decided I wouldn’t waste all of that aniseedy greenery and I made a stock out of them for the risotto. This isn’t essential but if you have them, you may as well if you have the time.

Risotto Stuffed Baked Fennel

In the original recipe they stuffed the fennel with wild rice. I decided to make a risotto using brown rice and the mushrooms I had in my fridge and use that to stuff them instead.

I have finally worked out how to make risotto from brown rice that actually looks and tastes like risotto. You have to part cook the rice first so it is nearly done. Then you add it to the risotto and continue as you would with uncooked risotto rice. It’ so much softer and creamier. I have to give credit to The Washer Up for this tip, he has been telling me to do it for ages.

And he was right. There I said it.

Risotto Stuffed Fennel

To make the fennel stock I cut the stalks and fronds off of the fennel bulbs and chopped them up roughly. I put them in  a large pot with 3 or 4 bay leaves, 15 whole peppercorns and a good teaspoon of salt. Bring this to the boil then lower the heat and simmer, covered for about an hour. Taste and add more salt if necessary . Then drain and store in the fridge or freezer in 500 ml or 1 litre pots.

You can just use a normal vegetable stock if you don’t have the fronds, time or inclination.

Mushroom Risotto Stuffed Baked Fennel Recipe

Serves  4, vegetarian. Adapted from

  • 300 ml brown rice
  • 600 ml fennel stock or water

Put the rice and stock/water in a pan. Bring to the boil then lower the heat, cover and cook for about 15 minutes until the rice is nearly cooked. Drain if necessary. Rinse under cold water if not using straight away to stop the cooking and set aside.

  • 4  fennel bulbs
  • olive oil
  • salt & black pepper
  • white wine (or cava)

Preheat oven to 180C. Cut about 2 cm off of the base of each bulb so it can stand up. Then cut another inch or so off of the tops. Remove any damaged/bruised outer layers. Using a teaspoon, hollow out the fennel bulbs as best you can (see picture above) reserving the fennel flesh for the risotto.

Stand the hollowed out fennel bulbs on a large sheet of foil, drizzle with olive oil and season well with salt & pepper. Start to bring the edges of the foil up and around the fennel then carefully pour in about 4 Tbsp white wine. Seal the foil package completely around the fennel but make sure that they are still standing. Bake for about 40-45 minutes until nicely softened.

  • reserved fennel flesh from above, finely chopped
  • 1 stick celery, finely chopped
  • 1/2 onion, finely chopped
  • 2 cloves, garlic, finely chopped
  • 1/2 tsp dried thyme
  • a good pinch of dried chilli flakes
  • 1 lemon, zested 
  • about 250 g mushrooms, cleaned & sliced
  • a splosh of white wine
  • up to 1 litre vegetable/fennel stock
  • 30 g grated manchego/parmesan
  • a handful of breadcrumbs
  • a handful of manchego/parmesan
  • fresh parsley, finely chopped
  • a handful of pine nuts, toasted in a dry pan
  • tomato pasta sauce/marinara sauce

Put the stock in a small pan over a medium heat and keep hot but not boiling.

Heat 2 Tbsp olive oil in a large pan over a medium heat, add the onion, celery, chopped fennel and a pinch of salt and cook for about 4 minutes until softened but not browned. Then add the garlic, thyme, chilli flakes, half of the lemon zest and cook for another 2 minutes.

Add the mushrooms, cook for three minutes until softened then add the part cooked rice. Add a good splosh of white wine and cook until evaporated. Season well with salt & black pepper then start adding the hot stock a ladleful at a time, waiting for it to be absorbed before adding the next ladleful, stirring and swirling occasionally. Keep going until you have used all the stock and the rice is cooked. The risotto should be soft and quite liquidy.

Add a squeeze of lemon, a little of the chopped parsley and stir in the 30 gr grated manchego/parmesan. Turn off the heat, put a lid on and leave for 3-5 minutes. Heat up your tomato sauce.

If your fennel bulbs are done remove them from the oven and put the grill/broiler on high.

Mix together the breadcrumbs, grated manchego/parmesan, rest of the lemon zest, some pine nuts & some chopped parsley in a small bowl.

Check the risotto for seasoning add more salt if necessary. Spoon some risotto into each fennel bulb right to the top and a little bit more, sprinkle over the breadcrumb mix and put them under the grill for a minute or two until browned.

To serve: Cover the base of each dish with a shallow pool of risotto and place the stuffed fennel in the middle. Spoon some of the tomato sauce on and around the dish and garnish with some of the breadcrumb mix if you have any left, some chopped parsley or fennel fronds.

Risotto Stuffed Fennel & Tomato Sauce

Buen Provecho!!

imagesCAFT0O3W

Wholemeal Chocolate Chunk and Hazelnut Cookies

9 Mar

Wholemeal Chocolate Chunk & Hazelnut Cookies

Just a quick post because I promised you the recipe for these last week after my first Healthy Baking with Chocolate workshop. I am in the middle of writing (and editing heavily) a speech on the relationship between food and health, particularly cancer, for the Marbella Women’s Week conference next week.

I say I. I mean we. Actually he is doing an awful lot of the editing and an awful lot of adding bits in too. It’s only a ten minute talk. I need to focus. So instead I’m writing about cookies.

Wholemeal Chocolate Chunk Cookies

Now I’m not saying you should eat these every day or anything but compared to most cookies these are much healthier.They are made with olive oil instead of butter. I use honey and maple syrup (or miel de cana) instead of sugar and the wholemeal spelt flour gives them a lovely flavour.

It’s Mother’s Day in the UK tomorrow so these are for my mum. She loves a biscuit with a cup of tea. They probably have too many bits in for her taste but it’s the thought that counts and I’ve ordered flowers in colours that match her lounge cushions and curtains so I should be safe. She does love it when things match.

Wholemeal Chocolate Chunk & Hazelnut Cookies

Wholemeal Chocolate Chunk & Hazelnut Cookies Recipe

Makes 10-12 cookies. Vegan, wheat-free.

  • 150 g wholemeal spelt flour
  •  1 tsp baking powder
  •  1/2 tsp baking soda 
  • 1/4 tsp salt
  •  4 Tbsp maple syrup or miel de cana
  •  1 Tbsp honey or agave syrup
  • 1/2 tsp vanilla extract
  •  a few drops of almond extract (optional)
  • 4 Tbsp olive oil
  •  about 70 g 70% dark chocolate, roughly chopped
  • 60 g hazelnuts or almonds roughly chopped

Preheat oven 175 C. Line a baking sheet with baking paper

In a bowl mix the flour, baking powder, baking soda, salt, nuts and chocolate together  well.

In a jug whisk together the oil, maple syrup/miel de cana, honey/agave, vanilla and almond extract, if using. Pour this into the flour bowl and gently mix together until just combined.

Take a tablespoon of the mix and put it on the lined tray, pressing it down slightly with your fingers. Continue with the rest of the mix leaving  an inch or so in between each so they can spread. Bake for 11 minutes until just golden, leave on the tray for 1 minute then remove to a wire rack to cool. This stops them drying out. Store in an airtight container.

Wholemeal Chocolate Chunk & Hazelnut Cookies

 Happy Mother’s Day Mum!

Now back to the speech…

imagesCAFT0O3W

food to glow

feel good food that's good for you

Pease Pudding

Just another WordPress.com weblog

Chica Andaluza

Sometimes Up a Mountain in Andalucia and sometimes Down by the Sea on the English South Coast

Agrigirl's Blog

Placemaking for Healthier Communities and a Healthier Planet

for the love of yum

A girl who loves to cook fresh, fun, and global cuisine.

The Path To Authenticity

Mind, Body & Spiritual Growth